The Best Fluffy Pancakes recipe you will fall in love with. Full of tips and tricks to help you make the best pancakes.

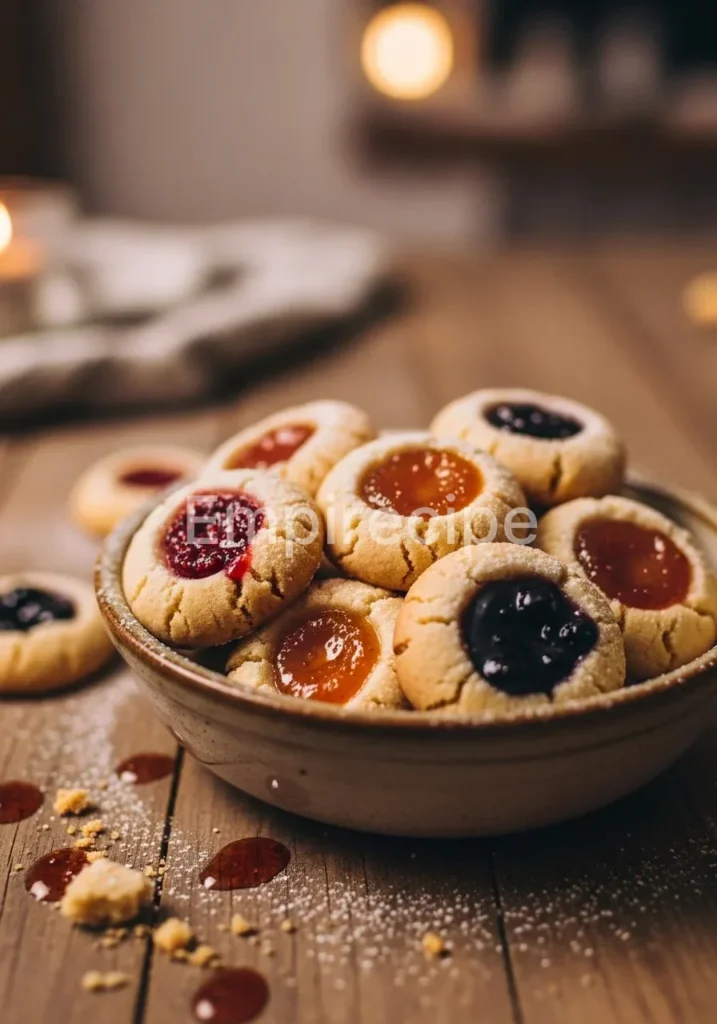
Thumbprint Cookies represent the pinnacle of shortbread engineering, balancing a crumbly, buttery base with a vibrant fruit center. Achieving the perfect ratio requires technical precision and high-quality fats. This recipe delivers a sophisticated texture that resists crumbling while maintaining a melt-in-your-mouth finish. We are building a structural masterpiece of flavor.
Table of Contents
Why You’ll Love This Thumbprint Cookies Recipe
- Unmatched structural integrity for the perfect jam pocket.
- Advanced creaming techniques ensure a superior crumb.
- Clean ingredients prioritize flavor over filler.
- Optimized for rapid baking cycles and consistent results.
Ingredients You’ll Need

The quality of your Thumbprint Cookies depends entirely on the chemical composition of your ingredients. Use European-style butter with a high milkfat percentage to ensure a rich, stable dough that doesn’t spread excessively in the oven.
| Ingredient | Quantity | Technical Note |
|---|---|---|
| Unsalted European Butter | 1 cup (226g) | Softened to exactly 65°F for optimal aeration. |
| Granulated Cane Sugar | 2/3 cup (135g) | Fine crystals yield a smoother texture. |
| Large Egg Yolk | 1 unit | Room temperature to prevent fat emulsion break. |
| Pure Vanilla Extract | 1 teaspoon | Use oil-based extract for heat stability. |
| All-Purpose Flour | 2 cups (250g) | Sifted to remove clumps and aerate. |
| Fine Sea Salt | 1/2 teaspoon | Enhances the profile of the lipid components. |
| Fruit Preserves (Raspberry or Apricot) | 1/2 cup | High-pectin content preserves prevent weeping. |
Substitutions & Variations
[ra_display_video url=”https://www.youtube.com/watch?v=vdR7Wx9PptY”]
Adapting Thumbprint Cookies for specific dietary requirements requires an understanding of ingredient functionality. To create a healthier version, substitute the granulated sugar with monk fruit sweetener at a 1:1 ratio; however, expect a slight change in the Maillard reaction.
For a gluten-free variation, utilize a high-quality almond flour blend with xanthum gum to replicate the protein structure of wheat. If you prefer a dairy-free profile, use refined coconut oil in its solid state, though the lack of milk solids will result in a paler Thumbprint Cookies batch.
Understanding ingredient functionality is critical when adapting Thumbprint Cookies for dietary requirements. For insights into baking the most popular pastries and how to achieve perfection, check out The Most Popular Pastries And How To Bake Them Perfectly.
Equipment You’ll Need
Precision baking is an engineering challenge that requires the right tools. To achieve the best results with Thumbprint Cookies, I recommend the following professional-grade equipment:
- Digital Kitchen Scale: Mandatory for measuring dry ingredients by weight rather than volume.
- Stand Mixer: Equipped with a paddle attachment for efficient lipid-sugar aeration.
- Silicone Baking Mats: Provides superior thermal insulation compared to parchment paper.
- Small Cookie Scoop: Ensures every dough ball has an identical mass for uniform baking.
- External Oven Thermometer: Internal oven sensors are notoriously inaccurate; verify your heat.
Step-by-Step Instructions

Follow these calibrated steps to produce high-performance Thumbprint Cookies every time.
- Calibrate the Base: Place the softened butter and sugar in the bowl of your stand mixer. Cream them on medium-high speed for exactly three minutes until the mixture reaches a pale, fluffy consistency. This incorporates necessary air pockets into the Thumbprint Cookies.
- Emulsify: Add the egg yolk and vanilla extract. Beat on medium speed for 60 seconds. Ensure the yolk fully integrates with the fat to create a stable emulsion.
- Integrate Dry Matter: Reduce the mixer speed to low. Gradually incorporate the sifted flour and sea salt. Stop the mixer the moment the last trace of white disappears. Over-mixing develops gluten, which makes Thumbprint Cookies tough rather than tender.
- Thermal Regulation: Wrap the dough in plastic and refrigerate for 30 minutes. This stabilizes the fats, making the dough easier to handle and preventing excessive spreading during the bake.
- Forming the Geometry: Preheat your oven to 350°F (175°C). Scoop one-tablespoon portions of dough and roll them into spheres. Place them two inches apart on your prepared baking sheets.
- The Impression: Use your thumb or the back of a rounded measuring spoon to press a deep well into the center of each sphere. If the edges crack, gently smooth them with a damp finger to maintain the structural integrity of your Thumbprint Cookies.
- Fill the Reservoir: Spoon approximately half a teaspoon of fruit preserves into each indentation. Do not overfill, as the jam will expand and bubble during the heating process.
- Thermal Processing: Bake for 12 to 14 minutes. The edges should be set but not heavily browned. The center of the Thumbprint Cookies should remain pale to ensure a soft bite.
- Cooling Cycle: Allow the cookies to rest on the baking sheet for five minutes before transferring them to a wire rack. This allows the internal starches to set.
To create high-performance Thumbprint Cookies consistently, precise measurements and timing are essential. For festive inspiration, explore our collection of special recipes with Valentine’s Day Food and Drinks.
Pro Tips for Success
Technical mastery of Thumbprint Cookies involves managing moisture and temperature.
- Prevent Cracking: If your dough is too cold, the edges will shatter when you press the indentation. Let it sit at room temperature for five minutes post-refrigeration to regain elasticity.
- Jam Optimization: If your preserves are too liquid, simmer them in a small saucepan for five minutes to reduce the water content before filling your Thumbprint Cookies. This prevents the “soggy bottom” syndrome.
- Uniformity: Use a 15-gram weight for each dough ball. This ensures that every piece in the batch reaches the desired internal temperature simultaneously.
- Salt Balance: Use Maldon sea salt flakes as a garnish after baking to contrast the sweetness of the fruit preserves.
Storage & Reheating Tips
Preserving the texture of Thumbprint Cookies requires protection against humidity. Store the completely cooled cookies in an airtight glass container. Place sheets of parchment paper between layers to prevent the jam centers from sticking to the bottoms of the cookies above them.
At room temperature, these will maintain peak quality for up to five days. For long-term storage, freeze the unbaked dough balls. When you are ready for a fresh batch of Thumbprint Cookies, bake them directly from frozen, adding two minutes to the total baking time.
Maintaining the texture of your Thumbprint Cookies is vital to ensure they remain fresh and delicious. For more tips on healthy eating and preservation methods, read about what is the healthiest way to eat radishes?.
What to Serve With This Recipe
While Thumbprint Cookies are traditionally a dessert, I prefer pairing them with elements that provide a sharp contrast to the buttery fats and concentrated sugars.
- Greek Yogurt: Serve a side of plain, full-fat Greek yogurt to add acidity and protein.
- Roasted Nuts: Lightly salted Marcona almonds provide a crunch that complements the soft crumb of the cookie.
- Herbal Infusions: A bitter Earl Grey or a sharp peppermint tea cuts through the lipid coating on the palate, refreshing your taste buds between bites of Thumbprint Cookies.
- Fresh Berries: A bowl of tart raspberries mirrors the flavors in the jam while adding fiber and antioxidants.
Frequently Asked Questions (FAQ)
Why did my Thumbprint Cookies spread so much in the oven?
Excessive spreading usually occurs because the butter was too warm or the sugar-to-flour ratio was imbalanced. Always weigh your flour to ensure you have enough structure to hold the fat. Additionally, ensure you do not skip the 30-minute refrigeration step, which is vital for thermal stability.
Can I use fresh fruit instead of jam?
Fresh fruit contains too much water for Thumbprint Cookies. As the water evaporates, it creates steam, which will collapse the cookie’s structure and leave you with a soggy mess. Always use a high-quality preserve or a reduced fruit compote for the filling.
How do I fix Thumbprint Cookies that cracked during shaping?
Cracking indicates the dough is too dry or too cold. Add a teaspoon of room-temperature milk to the dough if it feels crumbly. If the cracks happen during the “thumbprint” phase, simply use the warmth of your hands to smooth the dough back together before adding the filling.
Thumbprint Cookies are a delightful treat, known for their signature dimple filled with sweet jam. Often made from a buttery shortbread base, these cookies are perfect for celebrations and accompany a warm cup of tea, making them a delightful addition to any dessert table, as noted in their culinary history found at this link.
Final Thoughts
These Thumbprint Cookies bridge the gap between technical precision and culinary comfort. They offer a reliable, sophisticated result that impresses any palate. Mastering this recipe elevates your baking repertoire to a professional standard. Enjoy the perfect balance of butter and fruit.
Nutrition Information (per serving)
The following data represents a single serving of Thumbprint Cookies, calculated based on the standard ingredient formulation provided above.
| Nutrient | Amount per Serving |
|---|---|
| Calories | 145 kcal |
| Total Fat | 8g |
| Saturated Fat | 5g |
| Cholesterol | 25mg |
| Sodium | 45mg |
| Total Carbohydrates | 18g |
| Dietary Fiber | 0.5g |
| Sugars | 9g |
| Protein | 1.5g |
Thumbprint Cookies
Thumbprint Cookies represent the pinnacle of shortbread engineering, balancing a crumbly, buttery base with a vibrant fruit center. This recipe delivers a sophisticated texture that resists crumbling while maintaining a melt-in-your-mouth finish.
Ingredients
Method
- Place the softened butter and sugar in the bowl of your stand mixer. Cream them on medium-high speed for exactly three minutes until fluffy.
- Add the egg yolk and vanilla extract. Beat on medium speed for 60 seconds until fully integrated.
- Reduce the mixer speed to low. Gradually incorporate the sifted flour and sea salt until just combined.
- Wrap the dough in plastic and refrigerate for 30 minutes.
- Preheat your oven to 350°F (175°C). Scoop one-tablespoon portions of dough, roll them into spheres, and place them on prepared baking sheets.
- Press a deep well into each sphere with your thumb or the back of a rounded measuring spoon.
- Spoon approximately half a teaspoon of fruit preserves into each indentation.
- Bake for 12 to 14 minutes until the edges are set but not browned.
- Allow the cookies to rest on the baking sheet for five minutes before transferring to a wire rack.
Notes
Ensure butter is at the correct temperature for optimal aeration. Refrigerate dough for precise thermal stability. Store in an airtight container with parchment paper between layers.