The Best Fluffy Pancakes recipe you will fall in love with. Full of tips and tricks to help you make the best pancakes.
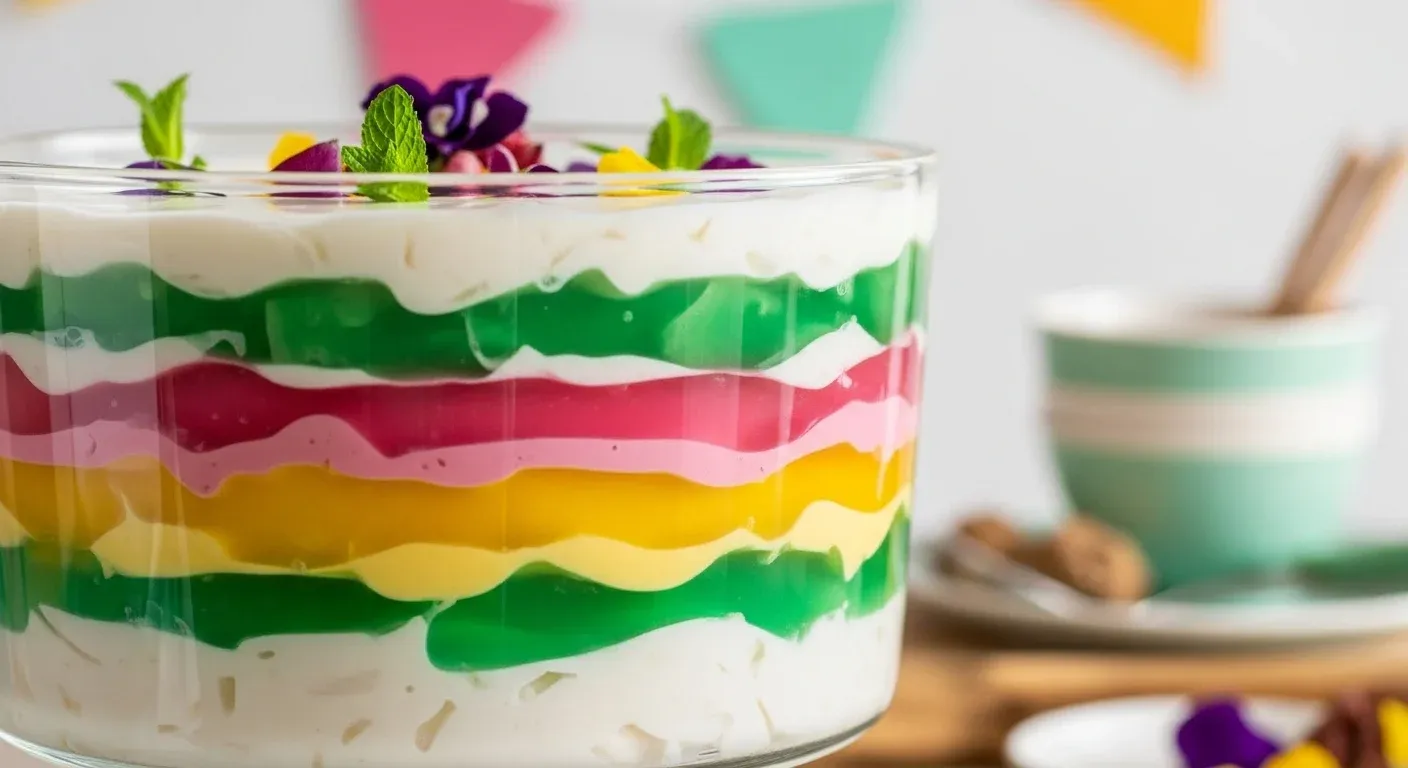
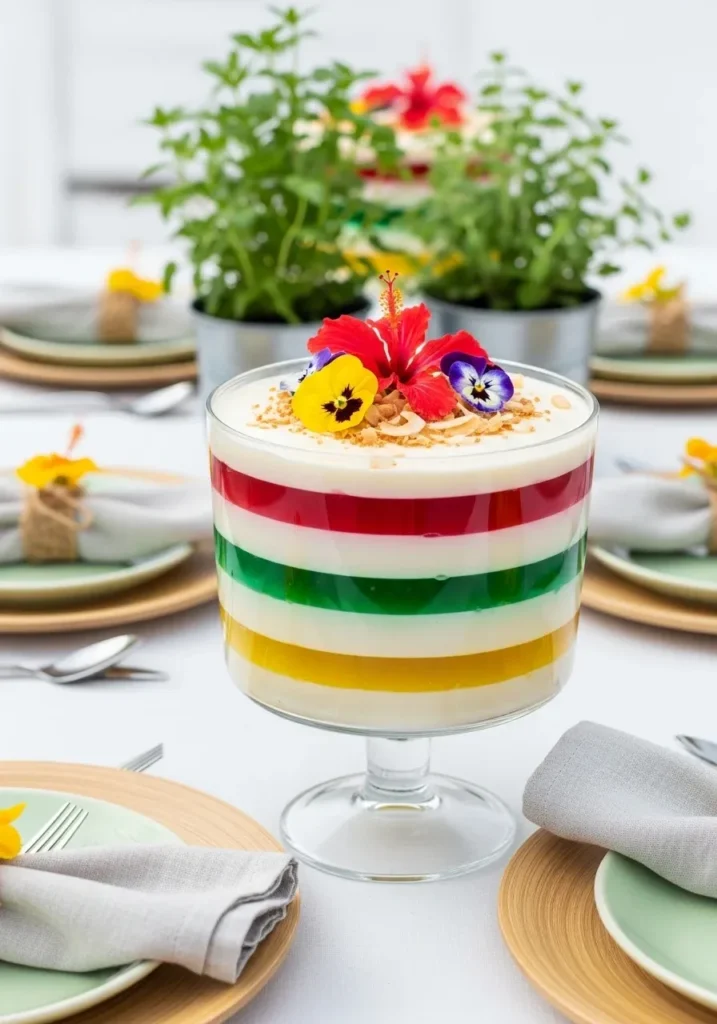
Welcome to my kitchen! This Layered Leche Gelatin Salad combines velvety creaminess with stunning, colorful layers. You will love this refreshing treat that melts away on your tongue.
It brings a festive spark to any eco-conscious table. Experience the perfect harmony of texture and sweetness today.
Table of Contents
Why You’ll Love This Layered Leche Gelatin Salad
- Vibrant, eye-catching rainbow aesthetics.
- Creamy, plant-based coconut richness.
- Zero-waste natural fruit coloring options.
- Light, refreshing, and gut-friendly results.
- Easy to prepare in advance for parties.
Ingredients You’ll Need
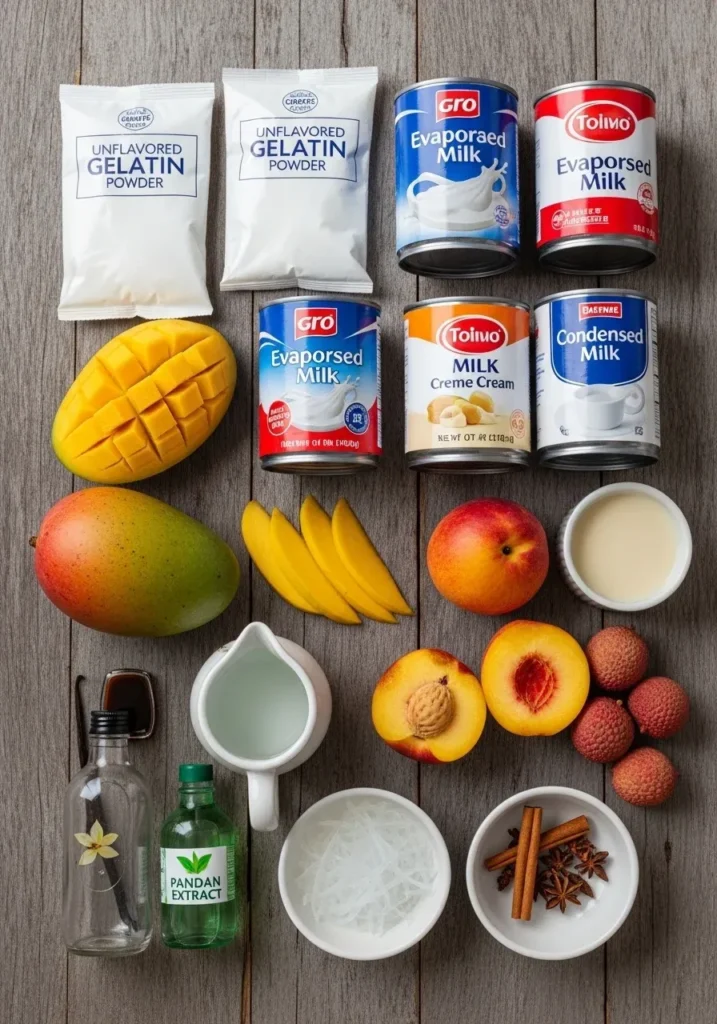
To create a high-quality Layered Leche Gelatin Salad, you must select the best possible plant-based ingredients. I always prioritize organic and ethically sourced products to ensure the flavors remain pure and the environmental impact stays low. This recipe transforms humble pantry staples into a masterpiece of texture and taste.
- 4 cups Water: Use filtered water to ensure a clean taste for your transparent layers.
- 1 can (13.5 oz) Full-Fat Coconut Milk: This provides the “leche” or milky base that gives the dessert its characteristic creaminess.
- 1 can (11 oz) Condensed Coconut Milk: A dairy-free alternative that adds deep sweetness and a silky mouthfeel.
- 4 tablespoons Agar-Agar Powder: Our plant-based gelatin substitute derived from seaweed, which offers a firm and reliable set.
- 1 cup Organic Cane Sugar: Adjust this based on your preference for sweetness, though the condensed milk provides plenty of sugar.
- 1 teaspoon Pure Vanilla Extract: A splash of high-quality vanilla elevates the creamy layers with a nostalgic aroma.
- Natural Food Colorants: Use 1 teaspoon of beet juice (red), turmeric powder (yellow), butterfly pea flower tea (blue), and matcha powder (green).
- Pinch of Sea Salt: A tiny amount of salt balances the richness of the coconut milk and enhances the overall flavor profile.
Substitutions & Variations
Note: This video is for demonstration purposes and may use a slightly different method.
You can easily customize this Layered Leche Gelatin Salad to suit your dietary needs or local availability. If you prefer a lighter version, swap the full-fat coconut milk for oat milk or soy milk, although the texture will be slightly less indulgent. For a sugar-free alternative, liquid stevia or monk fruit sweetener works beautifully, but remember to adjust the quantities as these are much sweeter than cane sugar.
If you want to experiment with flavors, try adding a hint of almond extract to the white layers or a squeeze of lime juice to the colored layers for a zesty kick. For a tropical twist, replace the water in the colored layers with clear coconut water. This addition boosts the electrolytes and adds a subtle natural sweetness that pairs perfectly with the creamy coconut base.
If you’re looking for more ways to customize your gelatin desserts, check out our recipe for Piña Colada Layered Gelatin. It offers a tropical twist and is a great alternative for those wanting a lighter option!
Equipment You’ll Need
- Large Saucepan: A heavy-bottomed pan ensures even heating and prevents the agar-agar from scorching.
- Whisk: Essential for incorporating the powders and ensuring a smooth, lump-free mixture.
- Glass Gelatin Mold: A 9-inch bundt pan or a rectangular glass dish works best for showing off those beautiful layers.
- Measuring Cups and Spoons: Precision is vital when working with agar-agar to ensure the salad sets correctly.
- Small Bowls: You will need several of these to mix your individual colors before adding them to the gelatin base.
- Fine Mesh Strainer: Use this to remove any undissolved particles or air bubbles for a crystal-clear finish.
Step-by-Step Instructions
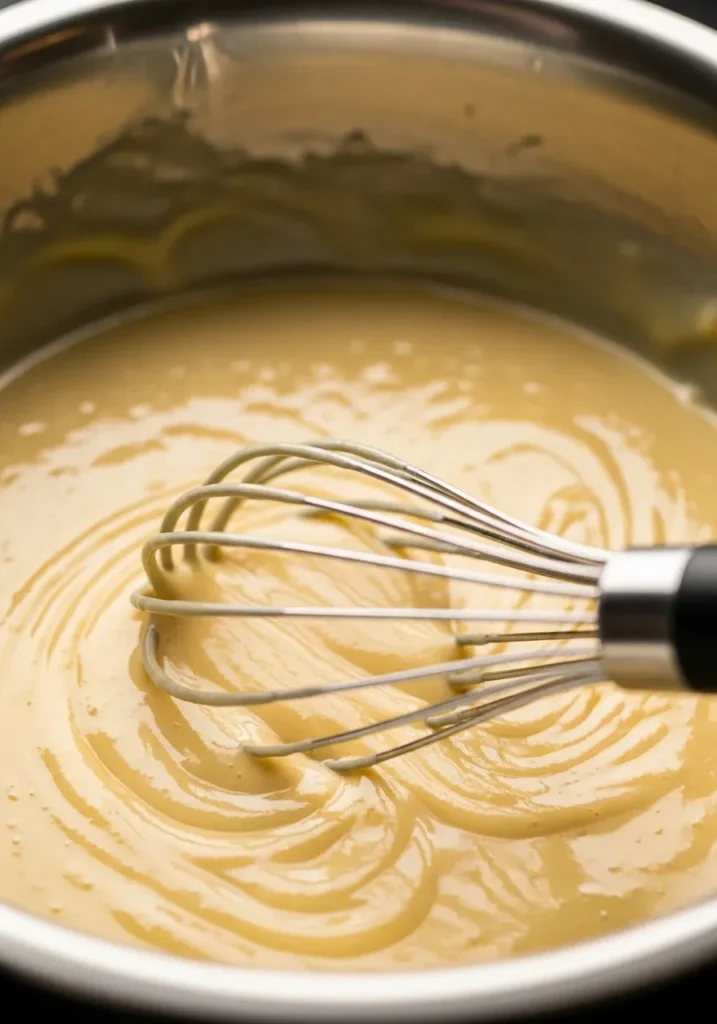
- Prepare the Base Mixture: In your large saucepan, combine the water and the agar-agar powder. Let it sit for about 10 minutes to allow the agar to hydrate. This step is crucial for achieving a smooth Layered Leche Gelatin Salad without any gritty bits.
- Boil and Dissolve: Turn the heat to medium-high and bring the mixture to a rolling boil. Whisk constantly for 2 to 3 minutes until the agar-agar completely dissolves. You should see a clear, slightly thickened liquid.
- Sweeten the Mix: Stir in the organic cane sugar and the pinch of sea salt. Continue whisking until the sugar granules disappear entirely into the solution.
- Create the Leche Base: Lower the heat to a simmer. Pour in the full-fat coconut milk, the condensed coconut milk, and the vanilla extract. Whisk gently until the mixture is uniform and creamy. Avoid boiling vigorously at this stage to prevent the coconut milk from separating.
- Divide for Colors: Carefully pour equal portions of the hot mixture into separate small bowls. Keep one bowl white (the “leche” layer). To the other bowls, add your natural colorants (beet juice, turmeric, butterfly pea, and matcha). Stir well until the colors are vibrant and even.
- The First Layer: Pour a thin layer of your first color into the bottom of the mold. Use a spoon to pop any surface bubbles. Place the mold in the refrigerator for about 5 to 7 minutes. The layer should be set enough to touch but still slightly tacky.
- Layering Technique: Gently pour a layer of the white “leche” mixture over the first colored layer. Use the back of a spoon to break the fall of the liquid, preventing it from piercing the layer below. Return to the fridge for another 5 minutes.
- Repeat the Process: Continue alternating between colored layers and the white leche layers until you use all the mixtures. If the remaining mixture in your bowls begins to set, simply reheat it gently on the stove or in a microwave for a few seconds to liquify it again.
- Final Chill: Once you complete all the layers, refrigerate the entire Layered Leche Gelatin Salad for at least 4 to 6 hours, or ideally overnight. This long chill ensures the layers bond together perfectly.
- Unmold and Serve: To unmold, gently press the edges of the gelatin away from the sides of the dish with your fingers. Invert the mold onto a large serving plate. If it sticks, dip the bottom of the mold in warm water for 10 seconds to loosen it.
To ensure a smooth texture for your Layered Leche Gelatin Salad, it’s essential to prepare your base mixture correctly. For more tips on achieving the perfect consistency, you might find our Layered Cranberry Gelatin recipe helpful.
Pro Tips for Success
Achieving the perfect Layered Leche Gelatin Salad requires a bit of patience and technical finesse. Firstly, never let the layers freeze. Agar-agar loses its structural integrity if frozen, resulting in a watery mess.
Secondly, ensure the previous layer is “tacky” rather than completely cold and hard before adding the next one. If the layer is too cold, the new layer might slide off when you slice the dessert.
Another professional secret involves temperature management. Keep your reserved gelatin mixtures in a warm water bath (bain-marie) while you wait for the layers in the fridge to set. This prevents them from hardening in the bowls. If you notice air bubbles on the surface after pouring a layer, quickly pass a kitchen torch over the top or use a toothpick to prick them for a professional, glass-like appearance.
Storage & Reheating Tips
This dessert thrives in the cold. Always store your Layered Leche Gelatin Salad in the refrigerator in an airtight container to prevent it from absorbing other food odors. It will remain fresh and delicious for up to 5 days. Since this is a cold-set dessert, you should never reheat the finished product unless you intend to melt it back down into a liquid state to start over.
If you are transporting the salad to a picnic or party, use an insulated cooler bag with ice packs. Agar-agar is more heat-stable than animal-based gelatin, so it won’t melt as easily at room temperature, but it still tastes best when served chilled. If the surface looks a bit dry after a few days, a quick mist of filtered water can restore its glossy shine.
Proper storage is key to keeping your dessert fresh and delicious. If you’re also a fan of easy-to-make cakes, consider trying our Layered Strawberry Cake for another chilled treat that’s perfect for warm days.
What to Serve With This Recipe
This Layered Leche Gelatin Salad is a star on its own, but you can elevate the experience with thoughtful pairings. I love serving it alongside a fresh fruit platter featuring acidic fruits like kiwi, pineapple, or strawberries. The acidity cuts through the creamy coconut richness beautifully.
For a more substantial dessert spread, pair it with light almond cookies or a crispy vegan tuile. If you are serving this at a brunch, it goes wonderfully with a side of roasted nuts or a light spinach and orange salad. The contrast between the soft gelatin and the crunchy elements creates a delightful sensory experience that your guests will surely remember.
Frequently Asked Questions (FAQ)
Can I use regular gelatin instead of agar-agar for this recipe?
Yes, you can substitute regular gelatin, but the texture will be softer and more “jiggly.” You will need to adjust the quantities according to the package instructions, usually about 1 tablespoon of gelatin powder for every 2 cups of liquid. Keep in mind that animal gelatin requires longer setting times between layers compared to the rapid-setting agar-agar.
How do I get the natural colors to stay vibrant?
Natural pigments like turmeric and matcha can fade if exposed to direct sunlight for too long. To keep your Layered Leche Gelatin Salad looking bright, keep it covered in the fridge until the very moment of serving. Also, avoid boiling the mixture once the natural dyes are added, as excessive heat can dull the colors of beet juice and butterfly pea flower.
Why did my layers separate when I sliced the salad?
Layer separation usually happens if the bottom layer was too cold or “over-set” before the next layer was added. To prevent this, make sure the surface of the layer in the mold is still slightly sticky to the touch. If you accidentally let a layer get too cold, lightly score the surface with a fork before pouring the next warm layer to help them bond.
Layered Leche Gelatin Salad is a delightful blend of flavors and textures, typically made with layers of flavored gelatin and cream. These visually stunning creations can often be enhanced with natural ingredients and are popular in many festive celebrations; you can learn more about this dessert style through this link.
Final Thoughts
Creating this Layered Leche Gelatin Salad brings so much joy to my eco-friendly home. It proves that plant-based desserts can be both stunning and indulgent. Share this colorful masterpiece with your loved ones and celebrate the beauty of conscious, vibrant eating. Stay sparkling and happy!
Nutrition Information (per serving)
The following table provides a breakdown of the nutritional content for one slice of this Layered Leche Gelatin Salad, assuming the recipe serves ten people.
| Nutrient | Amount per Serving |
|---|---|
| Calories | 210 kcal |
| Total Fat | 9g |
| Saturated Fat | 8g |
| Carbohydrates | 32g |
| Sugars | 28g |
| Protein | 2g |
| Sodium | 45mg |
Layered Leche Gelatin Salad
This Layered Leche Gelatin Salad combines velvety creaminess with stunning, colorful layers, bringing a refreshing treat that melts away on your tongue.
Ingredients
Method
- Combine the water and agar-agar powder in a large saucepan. Let it sit for about 10 minutes.
- Bring the mixture to a rolling boil, whisking constantly for 2 to 3 minutes until the agar-agar dissolves.
- Stir in the organic cane sugar and a pinch of sea salt until fully dissolved.
- Lower the heat, then add the coconut milk, condensed coconut milk, and vanilla extract. Whisk until creamy.
- Pour equal portions into small bowls, keeping one bowl white. Add colorants to the other bowls and stir.
- Pour a thin colored layer into the mold and refrigerate for 5 to 7 minutes until tacky.
- Layer a white mixture over the colored layer, refrigerate for another 5 minutes.
- Repeat layering until all mixtures are used. Refrigerate for at least 4 to 6 hours or overnight.
- To unmold, gently press the edges and invert onto a serving plate.
Notes
Ensure each layer is slightly tacky before adding the next layer to avoid separation. Store in an airtight container in the refrigerator for up to 5 days.