The Best Fluffy Pancakes recipe you will fall in love with. Full of tips and tricks to help you make the best pancakes.
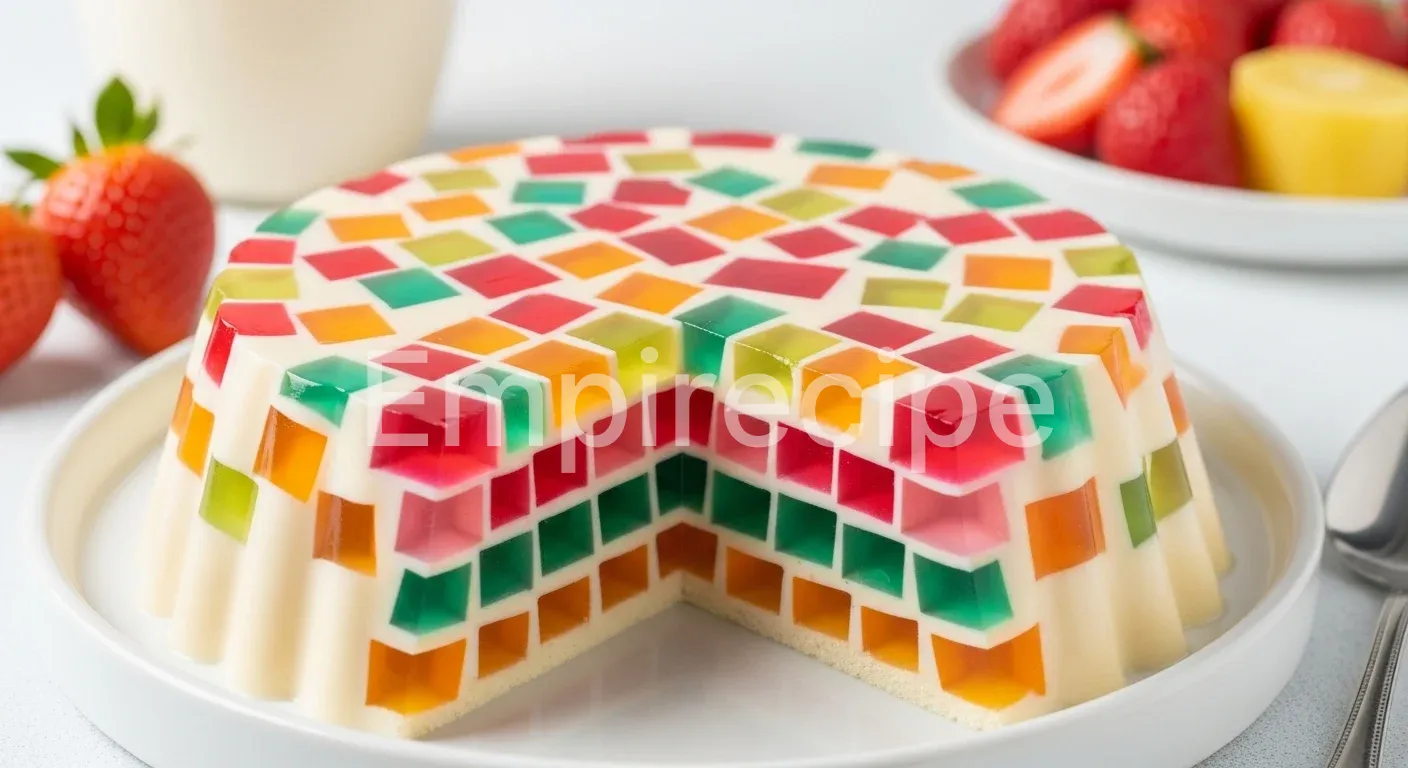
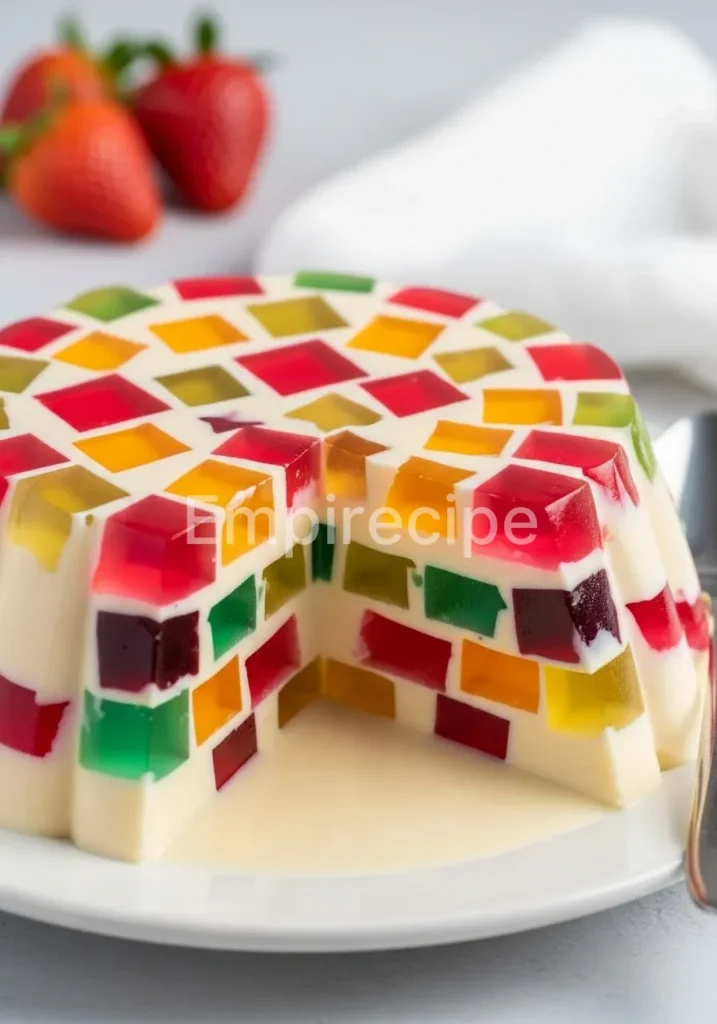
Stained Glass Gelatin offers a visually stunning mosaic of colors suspended in a creamy, sweet matrix. This dessert combines firm fruit-flavored cubes with a velvety condensed milk binder for a textural contrast that delights the palate. It delivers a refreshing, cool finish perfect for any high-end gathering or casual family meal.
Mastering this dish requires precision in gelatin ratios and temperature management to ensure perfect suspension. You will appreciate the structural integrity and the vibrant aesthetics of this modern classic. This recipe focuses on technical excellence to produce a clean, professional result every time. Let’s dive into the technical details of creating the perfect Stained Glass Gelatin.
Table of Contents
Why You’ll Love This Stained Glass Gelatin Recipe
- The high-contrast colors provide a bold visual appeal that serves as a centerpiece for any dessert table.
- It offers a unique textural experience by blending firm, chewy gelatin cubes with a silky, smooth cream base.
- This recipe uses simple, accessible ingredients while applying professional techniques for a superior outcome.
- The dessert is naturally gluten-free and provides a lighter alternative to traditional heavy, flour-based cakes.
Ingredients You’ll Need
Quality ingredients are the foundation of successful Stained Glass Gelatin. You must select gelatin with a consistent bloom strength to ensure the cubes hold their shape during the suspension process. For the colored components, standard flavored gelatin packages work best because they contain the necessary acidity and sugar to balance the creaminess of the binder.
The binder relies on high-quality sweetened condensed milk, which provides both the opacity and the structural viscosity needed to keep the “glass” pieces in place. Always use filtered water to ensure the colors remain vibrant and clear without mineral cloudiness.
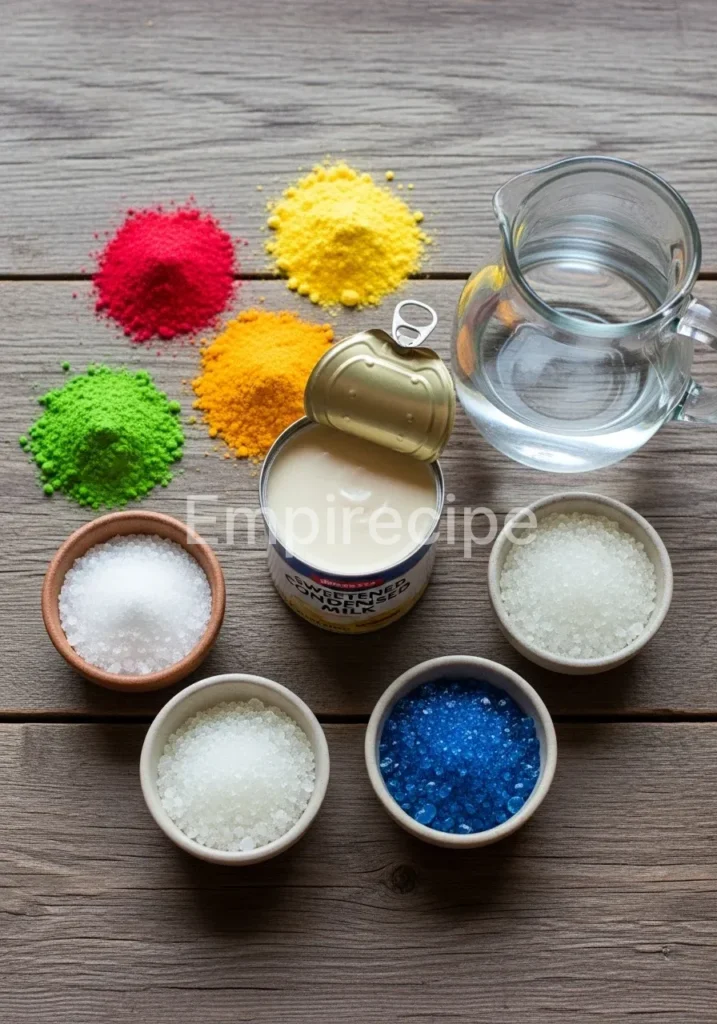
- 4 packages (3 oz each) of fruit-flavored gelatin in contrasting colors (e.g., cherry, lime, orange, and berry blue).
- 2 envelopes (0.25 oz each) of unflavored gelatin for the white binder.
- 1 can (14 oz) of high-quality sweetened condensed milk.
- 6 cups of filtered water (divided for boiling and cold hydration).
- Non-stick cooking spray (neutral flavor) for pan preparation.
Substitutions & Variations
[ra_display_video url=”https://www.youtube.com/watch?v=W5s7nxiv43I”]
While the classic version is iconic, you can adapt Stained Glass Gelatin to suit various dietary needs or flavor profiles. For a healthier profile, swap standard gelatin for sugar-free versions, though this may slightly alter the chewiness.
If you prefer a dairy-free approach, replace the condensed milk with a mixture of coconut cream and agave nectar, ensuring you adjust the unflavored gelatin ratio to account for the different fat content. You can also experiment with natural fruit juices and agar-agar for a vegan-friendly Stained Glass Gelatin, though agar-agar requires a different thermal setting point and will result in a more brittle texture compared to traditional animal-based gelatin.
For creative adaptations of your dessert, consider exploring Valentine’s Breakfast Ideas for Kids where you’ll find innovative and nutritious recipes that cater to various dietary preferences.
Equipment You’ll Need
Technical precision in Stained Glass Gelatin production requires the right tools. You will need four shallow rectangular containers (approximately 8×8 inches) to set the colored layers. Using glass or metal allows for efficient heat transfer, but ensure the surfaces are perfectly flat.
A sharp chef’s knife or a dedicated bench scraper is essential for achieving clean, geometric cuts. For the final assembly, a 9×13 inch glass baking dish or a decorative Bundt mold provides the best structural support. Finally, a fine-mesh whisk and a heat-resistant spatula will help you incorporate the gelatin without introducing excessive air bubbles, which can mar the clarity of the final product.
Step-by-Step Instructions
Follow these steps meticulously to ensure your Stained Glass Gelatin achieves the desired professional finish. The process is divided into two phases: the creation of the “glass” and the casting of the final mosaic.
- Prepare the Colored Cubes: Dissolve each package of flavored gelatin separately in 1 cup of boiling water. Do not follow the package instructions that call for cold water, as we need a firmer consistency for Stained Glass Gelatin. Pour each color into individual shallow containers and refrigerate for at least 4 hours until extremely firm.
- Hydrate the Unflavored Gelatin: In a medium bowl, sprinkle the two envelopes of unflavored gelatin over 1/2 cup of cold water. Let it stand for 5 minutes to “bloom.” This ensures the protein granules absorb water and will dissolve smoothly without clumping.
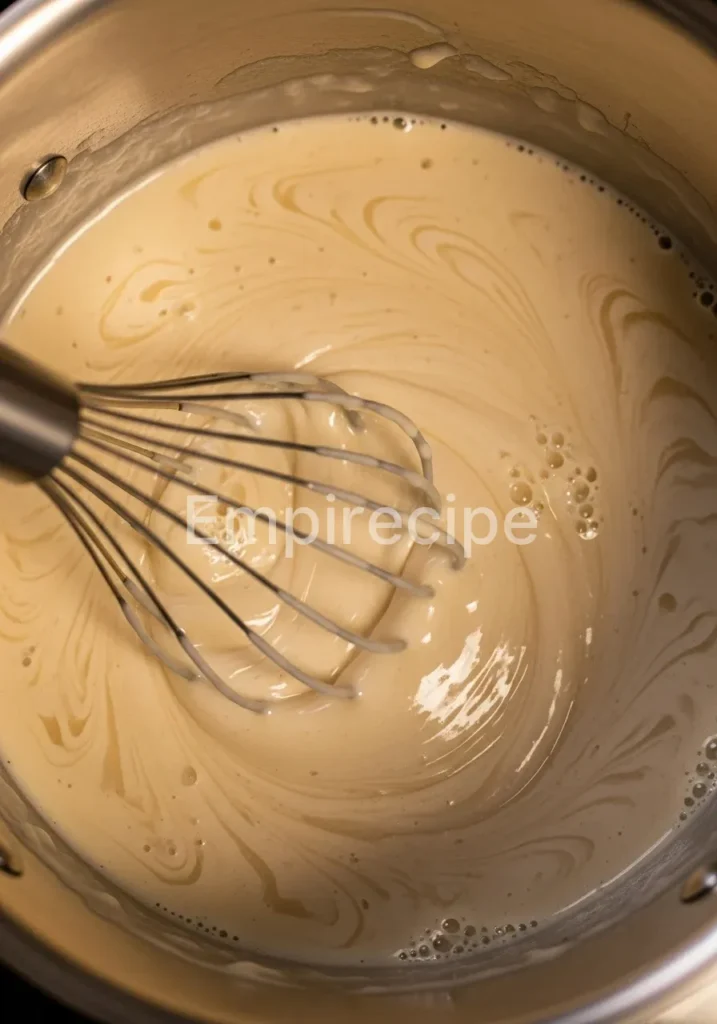
- Create the Creamy Binder: Add 1.5 cups of boiling water to the bloomed gelatin and whisk until completely clear. Stir in the can of sweetened condensed milk until the mixture is homogeneous. This is a critical stage for Stained Glass Gelatin; you must let this mixture cool to room temperature. If it is too hot, it will melt the colored cubes.
- Slice the “Glass”: Once the colored gelatin is set, use a sharp knife to cut them into 1/2-inch to 1-inch cubes. Be bold with your shapes; irregular polygons often look more authentic than perfect squares.
- Assemble the Mosaic: Gently toss the colored cubes together in your main 9×13 inch dish, distributing the colors evenly. Ensure there are no large gaps.
- The Final Pour: Carefully pour the cooled milk mixture over the cubes. Use a spatula to gently nudge the cubes so the liquid fills every crevice. Tap the pan on the counter to release trapped air.
- The Final Set: Place the Stained Glass Gelatin in the refrigerator for at least 6 to 8 hours, or ideally overnight. The structural integrity depends on a full cold-set cycle.
Once you perfect the technique of Stained Glass Gelatin, expand your culinary repertoire with Valentine’s Day Brunch Ideas that complement this dessert with delightful brunch options.
Pro Tips for Success
To elevate your Stained Glass Gelatin, pay attention to the “Bloom Strength.” Gelatin is a protein that forms a triple-helix structure; the faster it cools, the weaker the bond. For the firmest cubes, allow the colored mixtures to cool slightly at room temperature before putting them in the fridge. When cutting the cubes, dip your knife in warm water between cuts to ensure clean, sharp edges.
Another technical trick involves the temperature of the white binder. Use an instant-read thermometer; the milk mixture should be between 75°F and 80°F before pouring. This temperature is low enough to prevent melting the cubes but high enough to remain fluid for a smooth pour. If you see air bubbles on the surface after pouring, lightly spray them with a fine mist of food-grade ethanol or simply pop them with a toothpick for a glass-like finish.
Storage & Reheating Tips
Because Stained Glass Gelatin is a protein-based structure, it is highly sensitive to temperature fluctuations. Always store the finished dessert in the refrigerator, covered tightly with plastic wrap or a lid to prevent it from absorbing odors from other foods. It will remain fresh and structurally sound for up to 5 days.
Do not freeze this dessert; the crystallization of water during freezing will rupture the gelatin bonds, leading to a “weeping” effect and a grainy texture upon thawing. There is no reheating required for this dish, as it must be served cold. If you are transporting the Stained Glass Gelatin, use an insulated cooler with ice packs to maintain its rigidity, especially in warmer climates.
Preserve the quality of your creations with tips from Valentine’s Day Mini Cakes, offering insights on storage and presentation that ensure your desserts stay fresh and appealing.
What to Serve With This Recipe
While Stained Glass Gelatin is a standout solo performer, pairing it with the right side dishes can enhance the dining experience. Since this is a sweet and creamy dessert, it pairs exceptionally well with light, acidic components. Consider a fresh citrus salad with mint to cleanse the palate between bites.
For a more formal presentation, serve it alongside roasted berries or a sharp raspberry coulis. If you are serving this at a brunch, it complements savory items like roasted asparagus or a light spinach salad with a lemon vinaigrette. The goal is to balance the richness of the condensed milk with fresh, vibrant flavors that echo the fruitiness of the Stained Glass Gelatin cubes.
Frequently Asked Questions (FAQ)
Why did my colored cubes melt into the white mixture?
This is the most common technical failure when making Stained Glass Gelatin. It happens because the white milk mixture was too hot when poured. You must ensure the binder has cooled to room temperature (below 80°F) before assembly. Additionally, ensure the colored cubes have been refrigerated for at least 4 hours to maximize their thermal resistance.
Can I use fresh fruit inside the Stained Glass Gelatin?
You must be careful with fresh fruit. Certain fruits like pineapple, kiwi, and papaya contain enzymes (proteases) that break down gelatin proteins, preventing the Stained Glass Gelatin from setting. If you want to use these fruits, you must use canned versions, as the canning process heat-treats the fruit and deactivates the enzymes.
How do I get the gelatin out of the mold without breaking it?
To unmold Stained Glass Gelatin, dip the bottom of the pan into warm (not hot) water for 5 to 10 seconds. This slightly melts the outermost layer, acting as a lubricant. Invert a chilled plate over the mold, flip it quickly, and give it a firm shake. The vacuum should break, allowing the dessert to slide out smoothly.
Stained glass gelatin is a decorative dessert that layers colorful, flavored gelatin cubes within a creamy base, providing visual appeal and a unique taste experience. This dessert showcases not only creativity in its presentation but also the technical precision required in its preparation, allowing you to impress guests with a modern twist on traditional sweets. Learn more about the art of gelatin desserts through this comprehensive overview.
Final Thoughts
Creating Stained Glass Gelatin is a rewarding technical challenge that yields a beautiful, nostalgic result. This dessert connects generations through its vibrant colors and playful texture. Mastering the cooling stages ensures a professional finish that will impress any guest. Enjoy the process of crafting this edible art.
Nutrition Information (per serving)
This nutrition summary provides a general overview of the caloric and macronutrient content for a standard serving of Stained Glass Gelatin.
| Nutrient | Amount per Serving |
|---|---|
| Calories | 185 kcal |
| Total Fat | 3.5g |
| Saturated Fat | 2.2g |
| Cholesterol | 12mg |
| Sodium | 85mg |
| Total Carbohydrates | 34g |
| Sugars | 32g |
| Protein | 5g |
Stained Glass Gelatin
Stained Glass Gelatin offers a visually stunning mosaic of colors suspended in a creamy, sweet matrix. This dessert combines firm fruit-flavored cubes with a velvety condensed milk binder for a textural contrast that delights the palate.
Ingredients
Method
- Dissolve each package of flavored gelatin separately in 1 cup of boiling water. Pour into individual shallow containers and refrigerate for at least 4 hours until firm.
- In a medium bowl, sprinkle unflavored gelatin over 1/2 cup of cold water and let it stand for 5 minutes.
- Add 1.5 cups of boiling water to the bloomed gelatin and whisk until clear. Stir in sweetened condensed milk and cool to room temperature.
- Cut the chilled flavored jellies into 1/2-inch to 1-inch cubes.
- Toss the colored cubes together in a 9×13 inch dish, distributing evenly.
- Pour the cooled milk mixture over the cubes and refrigerate for 6 to 8 hours or overnight.
Notes
Ensure the milk mixture is cooled to room temperature before pouring over the cubes. Store the finished dessert in the refrigerator, covered tightly. Best consumed within 5 days.