The Best Fluffy Pancakes recipe you will fall in love with. Full of tips and tricks to help you make the best pancakes.
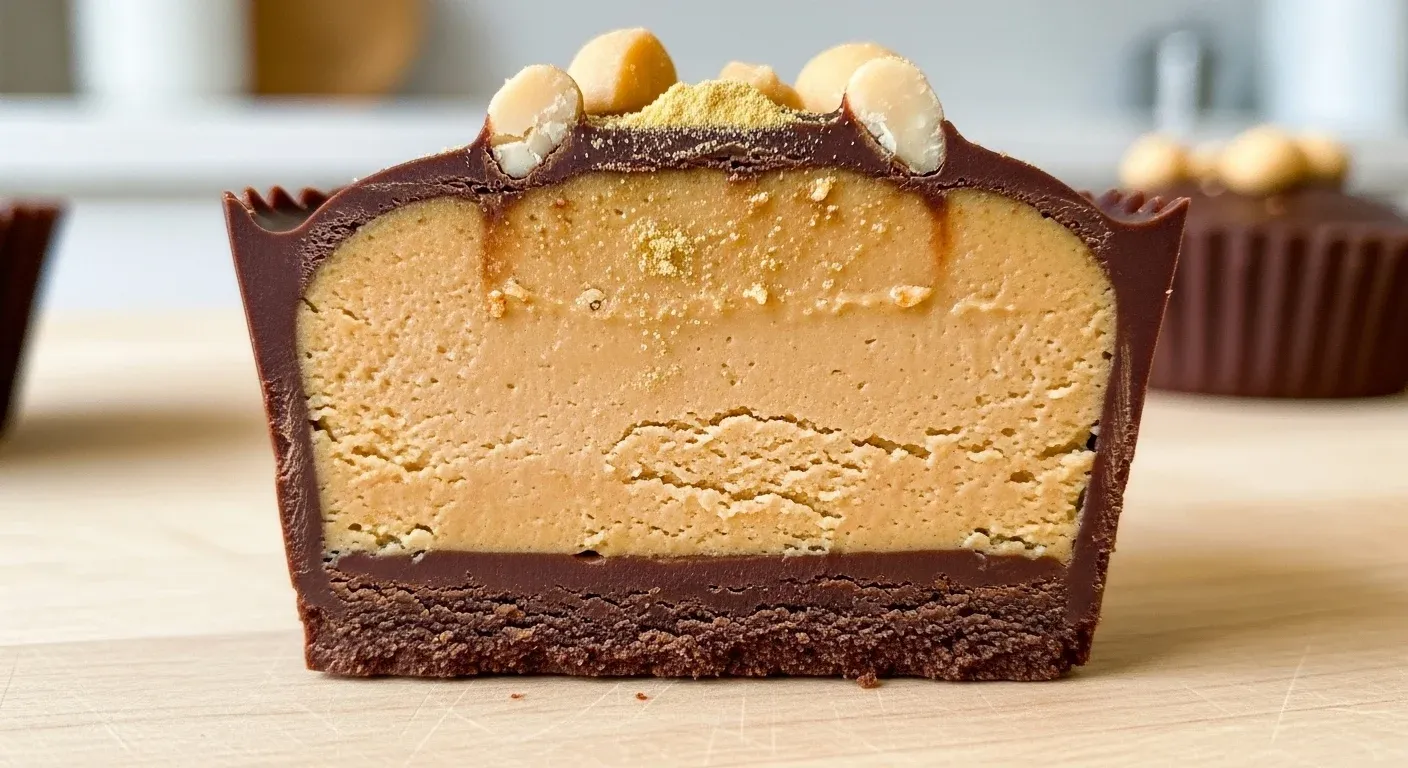
Experience a technical marvel of texture and taste. This Peanut Butter Collagen Cup offers a flawless snap and creamy core. We avoid processed sugars and focus on metabolic efficiency.
High-quality fats meet bioavailable proteins in every bite. Your kitchen becomes a lab for nutritional excellence today. Master the Peanut Butter Collagen Cup now. Excellence requires precision and focus.
Table of Contents
Why You’ll Love This Peanut Butter Collagen Cup
- Technical Precision: This recipe utilizes thermodynamic cooling to create a professional-grade chocolate snap that rivals luxury artisanal confectioneries.
- Metabolic Fuel: We combine high-density lipids from organic nuts with bioavailable peptides to ensure sustained energy without insulin spikes.
- Pure Efficiency: You can prepare a full batch of this Peanut Butter Collagen Cup in under twenty minutes using standard kitchen equipment.
Ingredients You’ll Need
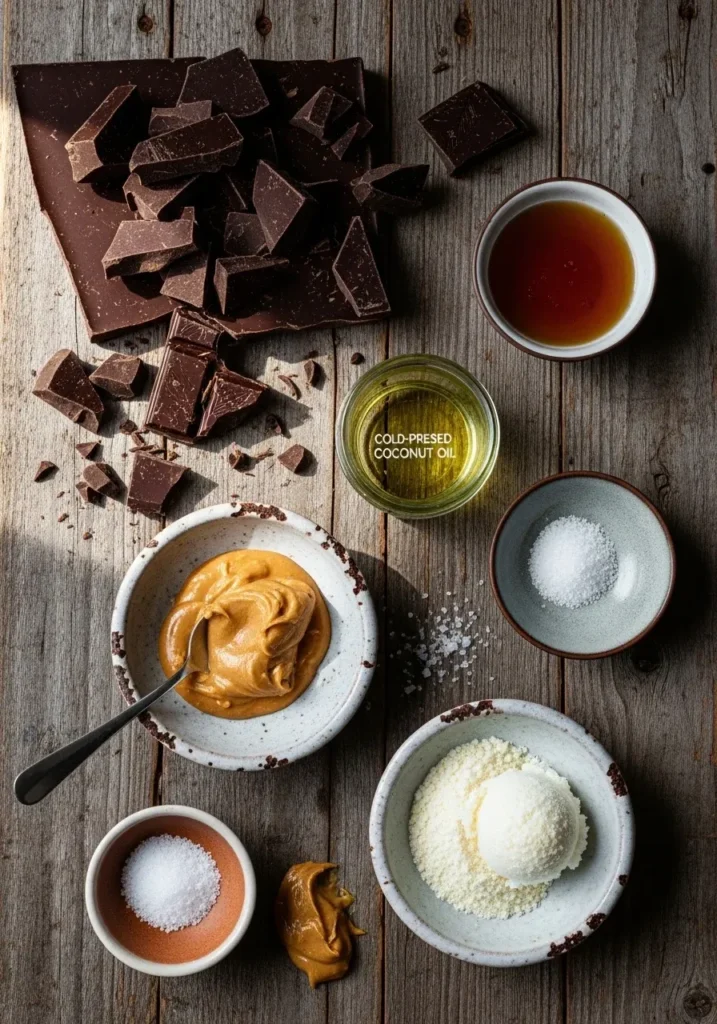
- Dark Chocolate (85% Cocoa or higher): 200 grams of high-stability cocoa solids. Do not compromise on the percentage; lower cocoa content contains excessive sugar that ruins the structural integrity.
- Natural Creamy Peanut Butter: 150 grams. Ensure the only ingredients are peanuts and salt. If your oil has separated, you must emulsify it thoroughly before measuring for the Peanut Butter Collagen Cup.
- Bovine Collagen Peptides: 40 grams of unflavored, grass-fed powder. This provides the structural protein matrix that sets the filling without needing industrial stabilizers.
- Raw Cold-Pressed Coconut Oil: 15 grams to adjust the melting point of the chocolate shell for a smoother mouthfeel.
- Pure Maple Syrup or Monk Fruit Drops: 10 milliliters for those who require a slight glycemic lift or a ketogenic-friendly sweetness profile.
- Flaky Maldon Sea Salt: A technical necessity to contrast the lipid-heavy profile of the Peanut Butter Collagen Cup.
Substitutions & Variations
Note: This video is for demonstration purposes and may use a slightly different method.
If you are managing a legume allergy, substitute the peanut butter with Stone-Ground Almond Butter or SunButter (sunflower seed butter). Both alternatives maintain the necessary viscosity for a successful Peanut Butter Collagen Cup.
For a strictly ketogenic version, ensure you utilize monk fruit as your primary sweetener and select a 100% cocoa mass chocolate bar. You may also experiment with adding a dash of cinnamon or espresso powder to the chocolate layer to enhance the complexity of the Peanut Butter Collagen Cup flavor profile.
If you’re managing a legume allergy, consider substituting peanut butter with Stone-Ground Almond Butter or SunButter for a delicious alternative. You can find a great recipe for similar frozen delights with this link to Frozen Peanut Butter Yogurt Bites.
Equipment You’ll Need
Precision requires the right tools. To execute the Peanut Butter Collagen Cup properly, you need a standard 12-slot muffin tin or a specialized silicone mold for easy removal. A double boiler is essential for melting chocolate without scorching the delicate cocoa butter fats.
If you do not own one, a heat-proof glass bowl over a simmering pot of water suffices. You will also need a fine-mesh whisk to integrate the collagen powder into the nut butter, ensuring no dry clumps remain. Finally, a digital kitchen scale is non-negotiable for Adam; volumetric measurements like “cups” are for amateurs who don’t care about consistency in their Peanut Butter Collagen Cup production.
Step-by-Step Instructions
- Prepare the Thermal Base: Place your silicone liners into the muffin tin. If you are using a metal tin without liners, verify that your non-stick coating is intact. Set the tin aside in a cool area of your kitchen.
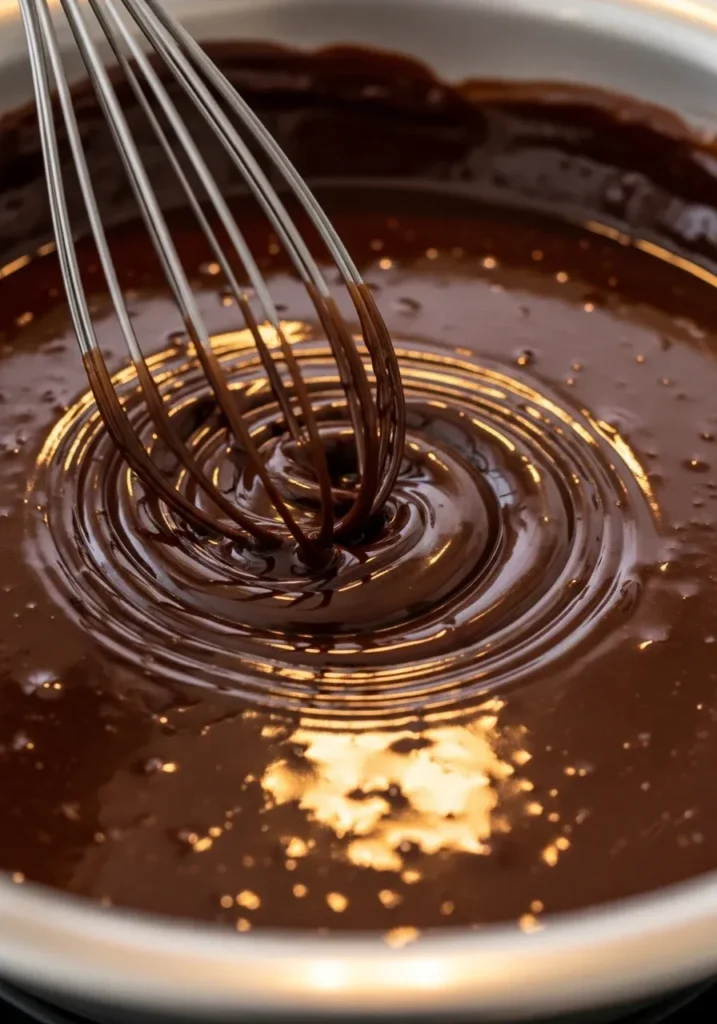
- Execute the Chocolate Melt: Break the 85% dark chocolate into uniform pieces. Place them in the double boiler along with the cold-pressed coconut oil. Stir constantly using a silicone spatula. Once the mixture reaches a fluid state of approximately 115 degrees Fahrenheit, remove it from the heat. This prevents the fats from separating and ensures a glossy finish for your Peanut Butter Collagen Cup.
- Construct the First Layer: Spoon approximately one tablespoon of the melted chocolate into the bottom of each mold. Tilt the tray in a circular motion to ensure the chocolate coats the bottom evenly. Place the tray in the freezer for exactly seven minutes to flash-set the base.
- Synthesize the Filling: In a medium mixing bowl, combine the natural peanut butter, collagen peptides, and your chosen sweetener. Use a vigorous whisking motion. The collagen will thicken the peanut butter, turning it into a malleable paste that is perfect for the Peanut Butter Collagen Cup center. If the mixture is too stiff, add half a teaspoon of melted coconut oil to regain pliability.
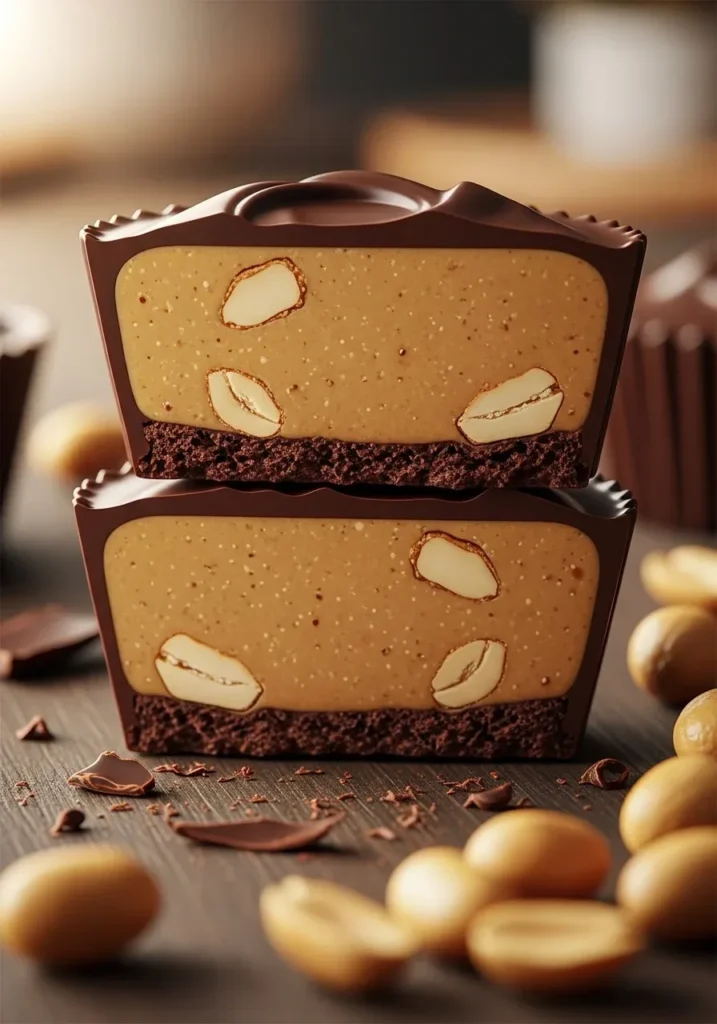
- Insert the Core: Remove the tray from the freezer. Take a small portion of the peanut butter mixture and roll it into a flat disc. Place the disc directly in the center of the frozen chocolate base. Ensure there is a small gap between the edge of the filling and the wall of the mold to allow the top layer of chocolate to seal the Peanut Butter Collagen Cup.
- Seal the Enclosure: Pour the remaining melted chocolate over the peanut butter discs. Use the back of a spoon to smooth the surface. Gently tap the muffin tin against the counter to release any trapped air bubbles. This step is critical for a professional Peanut Butter Collagen Cup aesthetic.
- Final Cryogenic Set: Sprinkle a few grains of flaky sea salt over each cup while the chocolate is still tacky. Return the tray to the freezer for at least thirty minutes. Once fully hardened, transfer the Peanut Butter Collagen Cup batch to a sealed container for long-term storage.
As you prepare the thermal base and execute the chocolate melt, mastering this technique is crucial for your Peanut Butter Collagen Cup. For more expert tips on perfecting candy recipes, check out Peanut Brittle Hacks: How to Nail It Every Single Time.
Pro Tips for Success
The secret to a world-class Peanut Butter Collagen Cup lies in the temperature delta. Never add warm filling to a frozen base, or you will cause internal sweating, which ruins the texture. Furthermore, understand your collagen.
Some brands are more hygroscopic than others and will absorb more moisture from the peanut butter. If your filling becomes crumbly, you have over-saturated the lipids with protein; simply add a touch more oil. For the ultimate snap, I recommend tempering the chocolate precisely.
Tempering creates the Beta-V crystal structure which gives the Peanut Butter Collagen Cup its signature shine and prevents it from melting the moment your fingers touch it. Don’t be lazy—measure your temperatures.
Storage & Reheating Tips
Because this Peanut Butter Collagen Cup lacks the chemical preservatives found in commercial candy, it is sensitive to ambient room temperatures. Store your finished cups in an airtight glass container in the refrigerator for up to two weeks. For maximum longevity, the freezer is your best friend.
A frozen Peanut Butter Collagen Cup can last up to three months without losing its structural or nutritional integrity. Do not reheat these. They are designed to be consumed cold. If they are too hard directly from the freezer, let them sit at room temperature for three minutes to allow the lipids to soften slightly before consumption.
To maximize the shelf life of your Peanut Butter Collagen Cup, proper storage is essential. For a nostalgic twist on candy storage and preservation, learn more about Circus Peanuts.
What to Serve With This Recipe
This Peanut Butter Collagen Cup is a dense source of macronutrients, so pair it wisely. If you are consuming it as a post-workout recovery tool, pair it with a cold-brew coffee or a green tea to stimulate your metabolism. For a more balanced snack profile, serve it alongside a bowl of fresh raspberries or blackberries.
The acidity of the berries cuts through the heavy fat content of the peanut butter. If you want a savory contrast, a small side of roasted pumpkin seeds or dry-roasted almonds provides a textural variety that complements the smooth nature of the Peanut Butter Collagen Cup.
Frequently Asked Questions (FAQ)
Can I use collagen powder in any peanut butter recipe?
Not necessarily. Collagen acts as a binder and a thickener. In a Peanut Butter Collagen Cup, this is beneficial for structure. However, in baked cookies, too much collagen can make the texture rubbery if you do not adjust the hydration levels of the dough.
Why is my chocolate turning white after a few days?
This is called “bloom.” It happens when the cocoa butter separates and rises to the surface. It usually occurs if the Peanut Butter Collagen Cup was subjected to rapid temperature fluctuations or if the chocolate wasn’t tempered correctly. It is still safe to eat, though the texture may be slightly chalky.
Is this recipe suitable for a high-protein diet?
Absolutely. Each Peanut Butter Collagen Cup is a concentrated source of amino acids. By replacing sugar-laden fillers with pure collagen peptides, we have optimized the protein-to-fat ratio, making this an ideal snack for anyone focused on muscle maintenance and joint health.
The Peanut Butter Collagen Cup is a nutritious treat that combines creamy peanut butter with collagen peptides, offering both taste and health benefits. This innovative snack is a delicious way to incorporate collagen into your diet, providing support for healthy skin and joints while satisfying your sweet tooth with a focus on natural ingredients.
Final Thoughts
The Peanut Butter Collagen Cup represents a shift in how we view treats. It merges technical precision with biological necessity. You deserve a snack that works as hard as you do.
Every bite reinforces your commitment to quality and health. Mastering this Peanut Butter Collagen Cup is your next victory.
Nutrition Information (per serving)
| Nutrient | Amount per Serving |
| Calories | 215 kcal |
| Total Fat | 17g |
| Saturated Fat | 8g |
| Net Carbohydrates | 5g |
| Protein | 9g |
| Fiber | 3g |
Peanut Butter Collagen Cup
Experience a technical marvel of texture and taste with this Peanut Butter Collagen Cup, offering a flawless snap and creamy core. Nutritionally optimized without processed sugars, it combines high-quality fats and bioavailable proteins in every bite.
Ingredients
Method
- Prepare the thermal base by placing silicone liners into a muffin tin and set aside.
- Melt dark chocolate and coconut oil in a double boiler until fluid, then remove from heat.
- Spoon chocolate into the bottom of each mold, tilt to coat, and freeze for 7 minutes.
- Combine peanut butter, collagen peptides, and sweetener in a bowl, whisk until smooth.
- Remove the tray from the freezer and insert peanut butter discs into the chocolate base.
- Pour remaining melted chocolate over the filling, smooth the surface, and freeze for 30 minutes.
- Sprinkle with sea salt before the chocolate hardens and store in an airtight container.
Notes
Ensure to follow temperature guidelines to maintain structure and texture. Store in the refrigerator for up to two weeks or freeze for up to three months.