The Best Fluffy Pancakes recipe you will fall in love with. Full of tips and tricks to help you make the best pancakes.
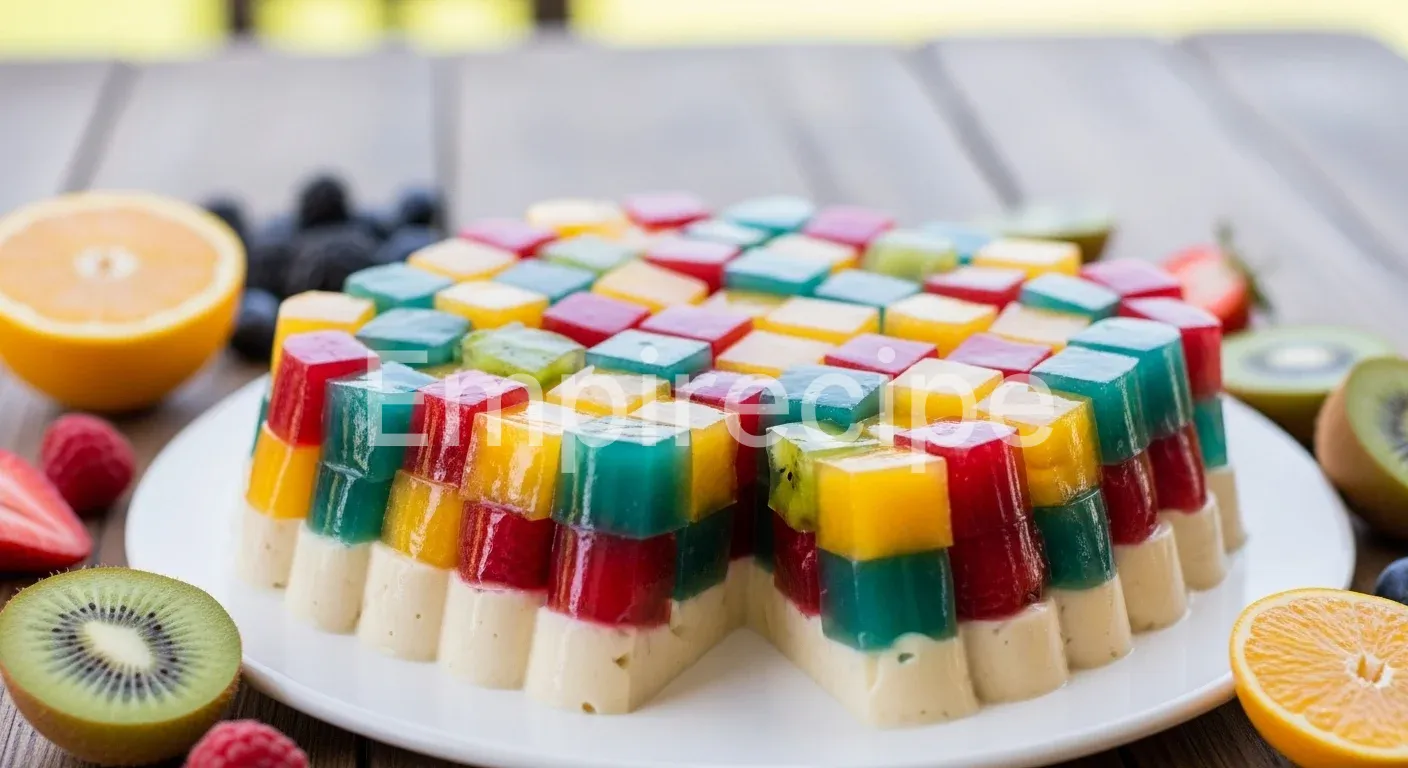
This vibrant Mosaic Gelatin Recipe brings a burst of joy to your table with its kaleidoscope of colors and silky textures. My plant-based version swaps traditional ingredients for sustainable alternatives without losing that signature creamy wobbliness. You will adore how the fruity cubes dance inside the sweet, milky base in every single bite.
Table of Contents
Why You’ll Love This Mosaic Gelatin Recipe
- Visually stunning and perfect for eco-conscious celebrations.
- Incredibly easy to prep with minimal active cooking time.
- Fully plant-based and naturally gluten-free for everyone to enjoy.
- Infinite flavor combinations using seasonal fruits or juices.
Ingredients You’ll Need
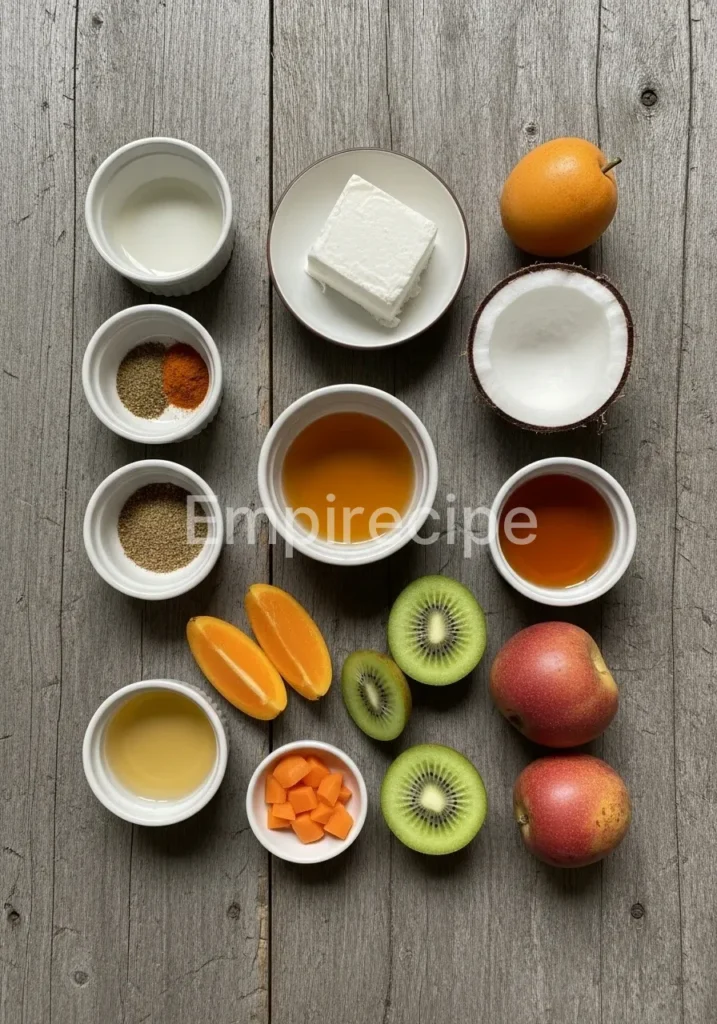
To create a truly spectacular result, prioritize high-quality, organic ingredients. Choosing natural fruit juices over synthetic syrups not only enhances the flavor profile but also aligns with a more conscious lifestyle. Here is everything you need for this Mosaic Gelatin Recipe:
| Ingredient Category | Specific Item | Quantity |
| The Mosaic Cubes | Fruit Juices (Mango, Berry, Kiwi) | 3 cups (1 cup per color) |
| Setting Agent | Agar Agar Powder | 4 teaspoons (divided) |
| Creamy Base | Full-Fat Coconut Milk | 2 cups |
| Sweetener | Agave Nectar or Maple Syrup | 1/2 cup |
| Flavor Enhancer | Pure Vanilla Bean Paste | 1 teaspoon |
| Liquid Base | Filtered Water | 1 cup |
Substitutions & Variations
Note: This video is for demonstration purposes and may use a slightly different method.
You can easily customize this Mosaic Gelatin Recipe to match the season or your personal cravings. Instead of coconut milk, try using a homemade cashew cream for a neutral, velvety finish that mimics traditional dairy. If you prefer a lighter version, substitute the creamy base with a clear, sparkling lemonade to create a “stained glass” effect that looks like edible jewelry.
For the colors, look toward nature’s pantry. Use beetroot juice for deep magentas, turmeric for vibrant yellows, and butterfly pea flower tea for dreamy blues. These swaps eliminate artificial dyes and introduce subtle earthy notes that elevate the dish from a simple dessert to a gourmet experience.
If you’re looking for an alternative that adds even more flair to your dessert, consider trying the Stained Glass Gelatin Cake. This vibrant dish is equally customizable, allowing you to unleash your creativity with seasonal flavors and textures.
Equipment You’ll Need
Having the right tools makes the process seamless and enjoyable. Gather these items before you begin your culinary adventure:
- Three or four small square glass containers for setting the colored gelatin.
- One large decorative mold or a rectangular glass baking dish for the final assembly.
- A small saucepan for boiling the liquids and activating the agar agar.
- A sharp knife for cutting precise, clean cubes.
- A silicone spatula to ensure you don’t leave any precious mixture behind.
- Measuring spoons and cups for accurate ratios.
Step-by-Step Instructions
Follow these detailed steps to master the Mosaic Gelatin Recipe with confidence and creativity.
- Prepare the Colored Cubes: Pour one cup of your first fruit juice into a small saucepan. Sprinkle one teaspoon of agar agar powder over the cold liquid. Let it sit for two minutes to bloom. Place the pan over medium heat and bring to a simmer, stirring constantly. Boil for exactly one minute to activate the setting properties. Pour the mixture into a square glass container. Repeat this process for each color you have chosen. Place the containers in the refrigerator for at least one hour until completely firm.
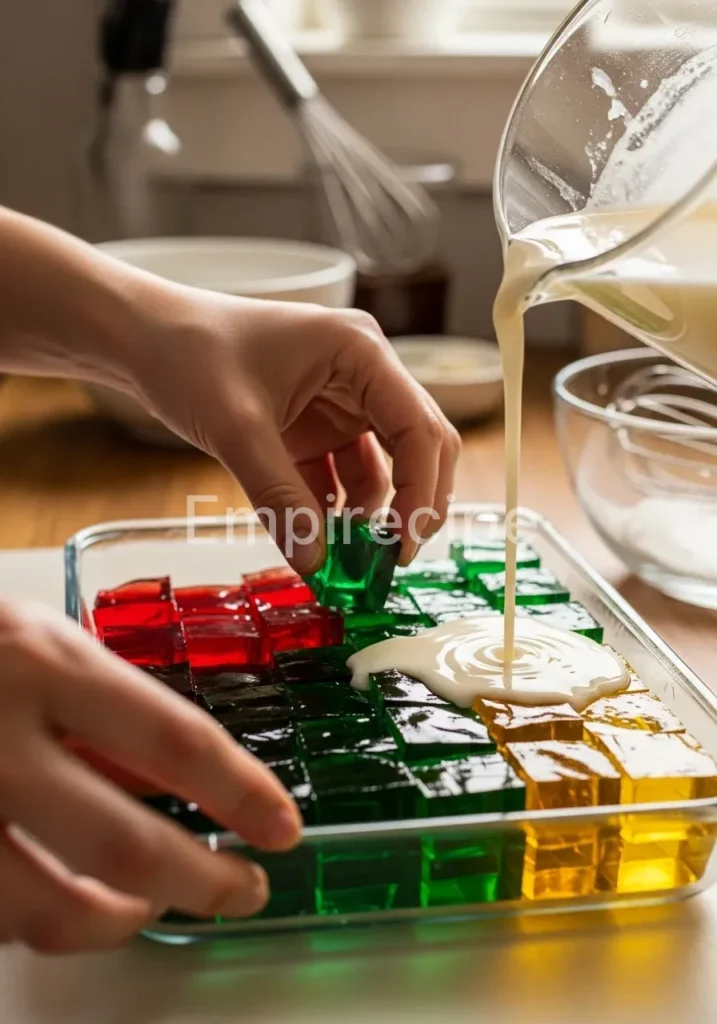
- Dice the Mosaic Pieces: Once the colored gels have set firmly, remove them from the fridge. Use a sharp knife to slice the gelatin into small, uniform cubes (about half an inch wide). I love mixing the colors in a large bowl gently to see the rainbow come to life. Be careful not to break the edges; we want sharp, clean lines for that professional look.
- Prepare the Creamy Base: In a clean saucepan, combine the coconut milk, filtered water, agave nectar, and vanilla bean paste. Sprinkle the remaining teaspoon of agar agar powder over the top. Again, let it bloom for two minutes. Bring the mixture to a gentle boil while whisking steadily. Once it reaches a boil, lower the heat and simmer for two minutes. Remove from heat and let it cool slightly on the counter for about 10 minutes. It must be warm enough to pour but not hot enough to melt your colored cubes.
- Assemble the Masterpiece: Lightly grease your large mold with a tiny drop of neutral oil. Distribute the colored cubes evenly throughout the mold. Gently pour the warm creamy base over the cubes. Use a spoon to shift the cubes slightly, ensuring the liquid fills every gap and no air bubbles remain trapped at the bottom. This creates the solid, vibrant base for our Mosaic Gelatin Recipe.
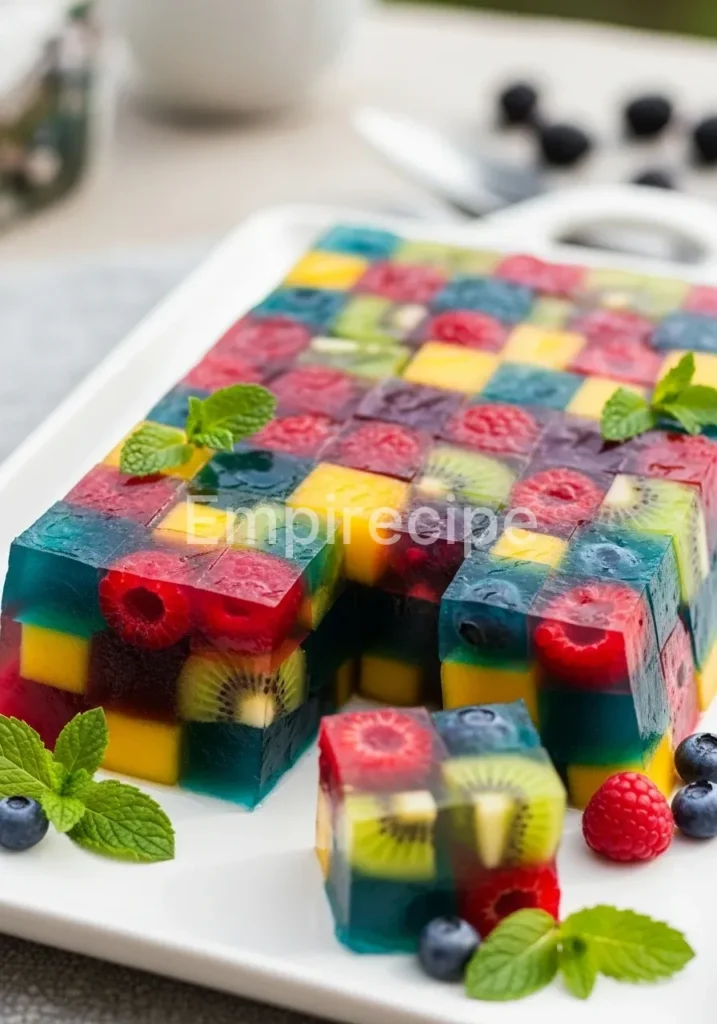
- Final Set and Unmolding: Place the mold in the refrigerator for at least four hours, though overnight is best for the flavors to meld. To unmold, gently pull the edges of the gelatin away from the sides with your fingers. Invert a flat serving plate over the mold and flip it quickly. The gelatin should slide out gracefully, revealing the beautiful mosaic pattern inside.
Mastering the Mosaic Gelatin Recipe is easy with the right guidance. For another colorful dessert option, check out our Colorful Gelatin Cheesecake, which offers a delightful combination of flavors and an eye-catching presentation.
Pro Tips for Success
Achieving the perfect wobble and visual clarity requires a bit of technical finesse. Here are my favorite secrets for the best Mosaic Gelatin Recipe results. First, remember that agar agar sets at room temperature, unlike animal-based gelatin.
Work efficiently once you boil the mixture, as it begins to firm up quickly as it cools. Second, ensure your colored cubes are completely chilled before adding the creamy base. If the base is too hot, the colors will bleed, turning your beautiful mosaic into a muddy swirl.
Third, use glass containers rather than plastic. Glass provides a smoother surface, which results in shinier, more reflective cubes that catch the light beautifully.
Storage & Reheating Tips
Store your finished dessert in an airtight container in the refrigerator to maintain its moisture and texture. It stays fresh and delicious for up to five days. However, do not freeze this dessert!
Freezing destroys the cellular structure of the agar agar, causing the gelatin to release all its water and turn into a grainy, unappealing mess once thawed. Since this is a cold dessert, reheating is unnecessary and would actually melt the entire structure back into a liquid state. Always serve it straight from the fridge for the most refreshing experience.
To preserve the freshness and texture of your dessert, store it properly and avoid freezing. For more information on similar delightful desserts, explore our Stained Glass Gelatin, which shares similar preparation techniques and results.
What to Serve With This Recipe
This dessert is a star on its own, but thoughtful pairings can enhance the dining experience. Serve it alongside a crisp, seasonal fruit salad tossed with fresh mint and lime zest to provide a zesty contrast to the creamy base. For a more sophisticated gathering, pair a slice with a glass of chilled hibiscus tea or a light sparkling kombucha.
If you want to add a bit of crunch, offer a side of toasted coconut flakes or crushed pistachios. These additions respect the plant-based nature of the recipe while adding layers of texture that delight the palate.
Frequently Asked Questions (FAQ)
Can I use fresh pineapple or kiwi in this Mosaic Gelatin Recipe?
Yes, you absolutely can! Unlike animal gelatin, which contains enzymes that prevent it from setting when mixed with fresh pineapple or kiwi, agar agar is a seaweed-based carbohydrate. It is completely unaffected by these enzymes.
This allows you to use any fruit you desire without the fear of a runny dessert. This makes the recipe incredibly versatile for fruit lovers.
Is agar agar a healthy substitute for traditional gelatin?
Definitely. Agar agar is rich in fiber and contains no calories, sugar, or fat. It is a fantastic option for those following a vegan, halal, or kosher diet.
Since it is derived from sea algae, it is a sustainable resource that doesn’t rely on animal byproducts. It also provides a firmer, “cleaner” bite compared to the bouncy, rubbery texture of traditional gelatin.
How do I prevent the colors from bleeding into the white base?
The secret lies in the temperature of the creamy liquid. You must let it cool until it is just lukewarm to the touch. If you see steam rising aggressively from the pan, it is still too hot.
Wait until it feels barely warm, then pour it slowly over the cold cubes. This ensures the cubes maintain their sharp edges and vibrant, distinct colors within the white matrix.
This Mosaic Gelatin Recipe is a creative dessert that showcases vibrant colors and unique flavor combinations, making it a favorite at gatherings. The art of gelatin desserts has a rich history, often linked to the broader world of gelatin-based dishes that span various cultures.
Final Thoughts
Creating this timeless Mosaic Gelatin Recipe always fills my heart with creative energy. It transforms simple, sustainable ingredients into a glowing centerpiece that sparks conversation and joy. This dessert proves that plant-based living is never boring, but rather a colorful celebration of life.
Nutrition Information (per serving)
| Nutrient | Amount |
| Calories | 145 kcal |
| Total Fat | 9g |
| Carbohydrates | 16g |
| Fiber | 2g |
| Protein | 1g |
Mosaic Gelatin Recipe
This vibrant Mosaic Gelatin Recipe brings a burst of joy to your table with its kaleidoscope of colors and silky textures, made with plant-based ingredients to create a creamy, wobbly dessert that’s visually stunning and perfect for eco-conscious celebrations.
Ingredients
Method
- Prepare the Colored Cubes: Pour one cup of your first fruit juice into a small saucepan. Sprinkle one teaspoon of agar agar powder over the cold liquid. Let it sit for two minutes to bloom. Place the pan over medium heat and bring to a simmer, stirring constantly. Boil for exactly one minute to activate the setting properties. Pour the mixture into a square glass container. Repeat this process for each color you have chosen. Place the containers in the refrigerator for at least one hour until completely firm.
- Dice the Mosaic Pieces: Once the colored gels have set firmly, remove them from the fridge. Use a sharp knife to slice the gelatin into small, uniform cubes. Mix the colors in a bowl gently to see the rainbow come to life.
- Prepare the Creamy Base: In a clean saucepan, combine coconut milk, filtered water, agave nectar, and vanilla bean paste. Sprinkle the remaining teaspoon of agar agar powder over the top. Let it bloom for two minutes. Bring the mixture to a gentle boil while whisking steadily. Once it reaches a boil, lower the heat and simmer for two minutes. Remove from heat and let it cool slightly.
- Assemble the Masterpiece: Lightly grease your large mold with neutral oil. Distribute the colored cubes evenly throughout the mold. Gently pour the warm creamy base over the cubes, ensuring no air bubbles remain.
- Final Set and Unmolding: Place the mold in the refrigerator for at least four hours. To unmold, gently pull the edges of the gelatin away from the sides and invert it onto a plate.
Notes
Store in an airtight container in the refrigerator for up to five days. Do not freeze!