The Best Fluffy Pancakes recipe you will fall in love with. Full of tips and tricks to help you make the best pancakes.
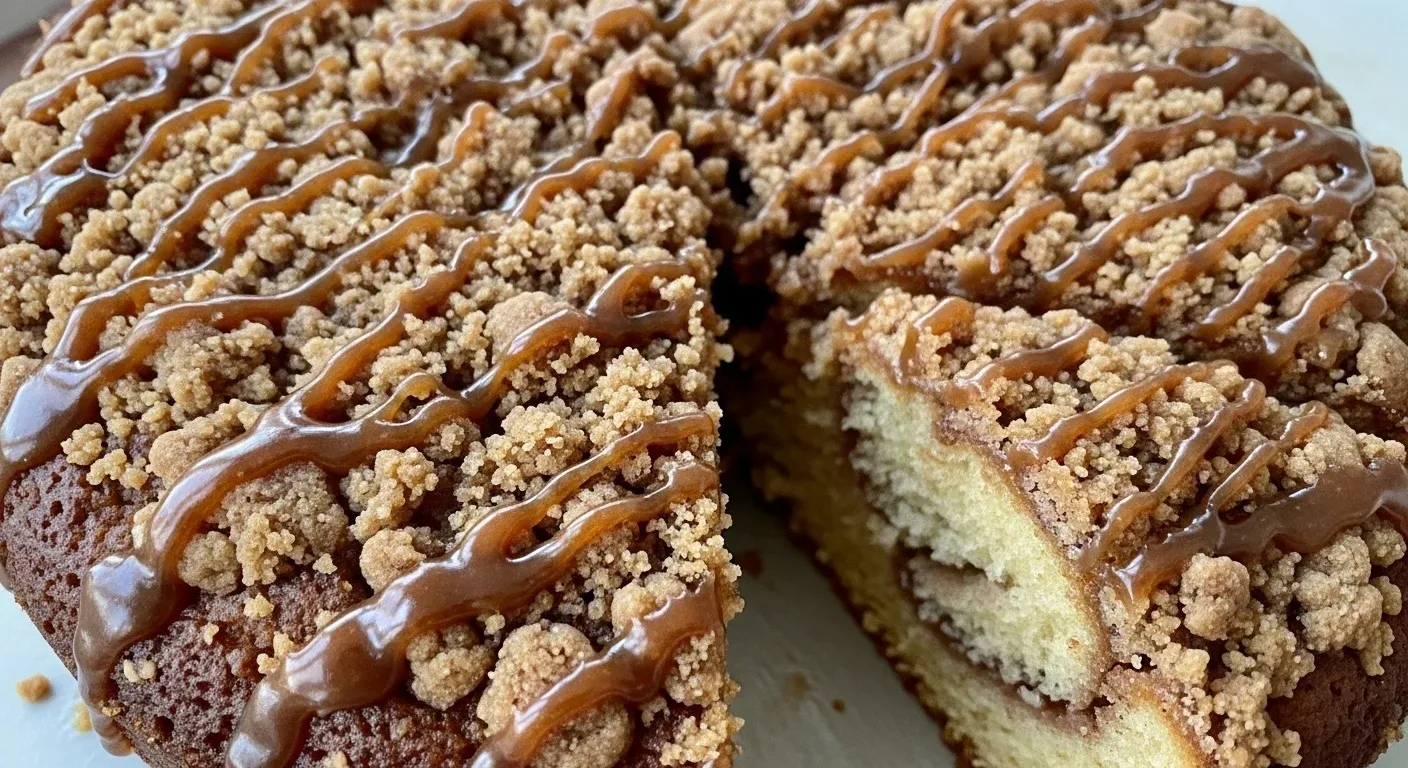
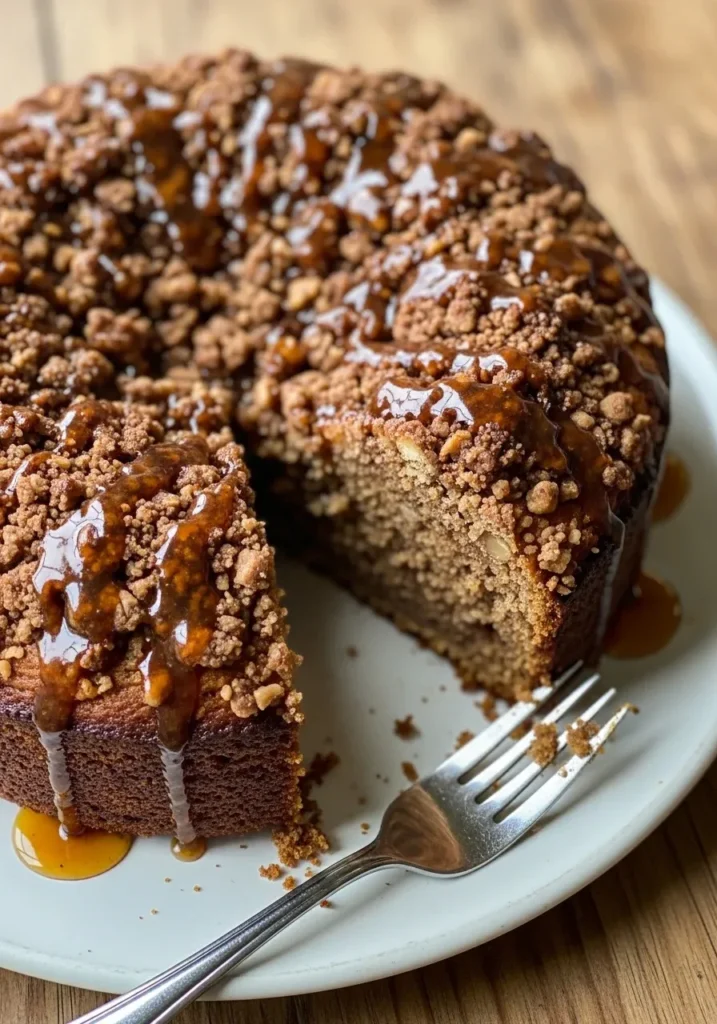
This Maple Coffee Cake redefines morning indulgence with its architectural crumb and deep sweetness. Pure maple syrup provides a complex profile that white sugar cannot match. Every bite offers a technical balance between crunchy streusel and moist interior. Experience how Maple Coffee Cake transforms a simple coffee break.
Table of Contents
Why You’ll Love This Maple Coffee Cake
- Dynamic Texture: A precise ratio of sour cream creates a dense, velvety crumb that resists drying out.
- Superior Flavor Profile: Real maple syrup offers earthy, caramel-like undertones that outperform artificial extracts.
- High Efficiency: This recipe utilizes standard pantry staples but delivers a high-end, professional bakery result.
- Nutrient Density: By using Greek yogurt and nuts, we boost the protein and healthy fat content compared to standard cakes.
Ingredients You’ll Need
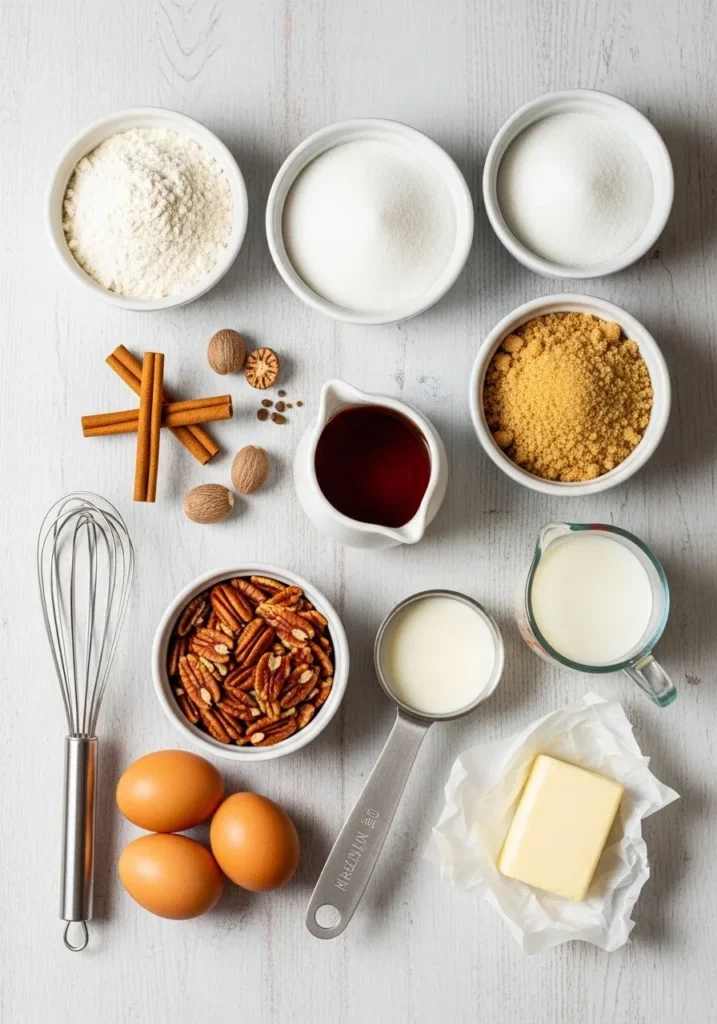
The quality of your Maple Coffee Cake depends entirely on the technical grade of your components. I recommend using Grade A Dark Color (formerly Grade B) maple syrup for its robust mineral content and stronger flavor profile. This syrup provides the necessary acidity to react with the leavening agents, ensuring a perfect rise.
- All-Purpose Flour: Use a brand with a consistent protein content (around 11.7%) to ensure structural integrity without toughness.
- Grade A Dark Maple Syrup: This is the soul of your Maple Coffee Cake, providing moisture and deep saccharine notes.
- Full-Fat Sour Cream: Essential for its high fat content and lactic acid, which tenderizes the gluten strands.
- Unsalted European-Style Butter: Higher fat percentage (82%+) reduces water content, leading to a more tender cake.
- Large Organic Eggs: These act as the primary emulsifier, binding the fats and liquids into a cohesive batter.
- Pecans or Walnuts: These provide the necessary textural contrast against the soft crumb of the Maple Coffee Cake.
- Cinnamon and Nutmeg: These spices enhance the woodsy notes of the maple syrup.
- Baking Powder and Soda: A dual-leavening system ensures a light, airy structure despite the heavy syrup.
- Vanilla Bean Paste: Adds visual interest and a more concentrated flavor than standard liquid extract.
Substitutions & Variations
Note: This video is for demonstration purposes and may use a slightly different method.
To optimize the health profile of your Maple Coffee Cake, you can swap traditional flour for a high-quality gluten-free 1:1 blend. Ensure the blend contains xanthan gum to mimic the elasticity of wheat. For a lower glycemic index, replace half of the granulated sugar in the streusel with coconut sugar.
If you need a dairy-free alternative, thick coconut cream provides the necessary viscosity to maintain the Maple Coffee Cake structure. These swaps maintain the bold flavor while catering to specific dietary requirements.
To enhance the health benefits of your Maple Coffee Cake, consider using natural ingredients like those found in Maple Bacon Carrots. This sweet and savory dish can inspire healthier substitutions without compromising flavor.
Equipment You’ll Need
Precision is non-negotiable in modern baking. You need a digital kitchen scale to measure ingredients by weight, as volume measurements are notoriously inaccurate. A 9-inch springform pan is ideal for this Maple Coffee Cake because it allows for easy removal without damaging the delicate streusel topping.
Use a high-quality stand mixer or a powerful hand mixer to achieve a stable emulsion during the creaming stage. Finally, an instant-read thermometer is your best friend; it ensures your Maple Coffee Cake reaches an internal temperature of 200°F (93°C), indicating a fully set crumb without overbaking.
Step-by-Step Instructions
- Preheat and Prep: Calibrate your oven to 350°F (175°C). Grease your springform pan with butter and line the base with parchment paper. This technical step prevents sticking and ensures even heat distribution.
- Streusel Synthesis: In a medium bowl, combine flour, brown sugar, cinnamon, and chilled butter cubes. Use your fingertips or a pastry cutter until the mixture resembles coarse sand. Stir in the chopped nuts and set aside.
- Dry Component Integration: Whisk the flour, baking powder, baking soda, and salt in a large bowl. Aerating the dry ingredients prevents clumps and ensures even distribution of the leavening agents throughout the Maple Coffee Cake batter.
- Creaming Phase: In your stand mixer, beat the softened butter and granulated sugar until the volume increases and the color lightens. This incorporates air bubbles that will expand in the oven.
- Emulsification: Add the eggs one at a time, ensuring each is fully incorporated before adding the next. Pour in the vanilla bean paste and a portion of the maple syrup.
- The Folding Method: Alternately add the dry ingredients and the sour cream to the butter mixture. Start and end with the dry ingredients. This technique prevents the batter from breaking and maintains the Maple Coffee Cake‘s delicate texture.
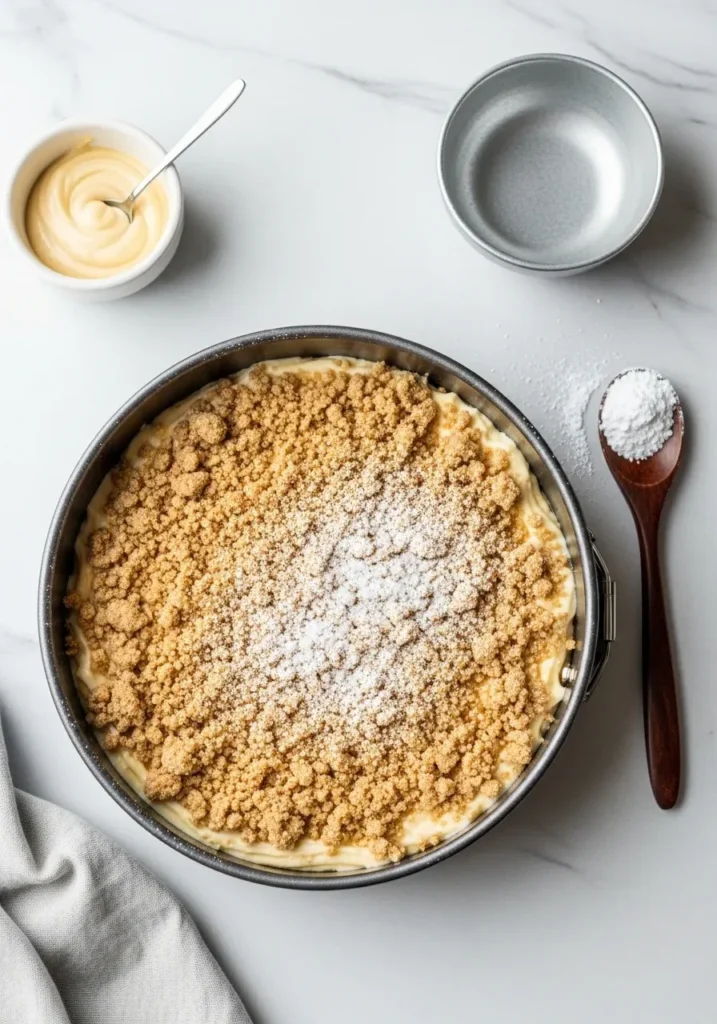
- Layering Strategy: Pour half of the batter into the prepared pan. Smooth the surface with an offset spatula. Sprinkle half of the streusel over the batter. This creates a hidden vein of flavor inside the Maple Coffee Cake.
- Final Assembly: Carefully spread the remaining batter over the streusel layer. Top with the rest of the nut mixture. Press down slightly to ensure the topping adheres to the cake during the rise.
- The Bake: Place the pan on the middle rack. Bake for 45 to 55 minutes. Check the internal temperature with your digital thermometer. The Maple Coffee Cake is finished when it hits the 200°F mark.
- Cooling Cycle: Allow the cake to cool in the pan for 15 minutes. This allows the internal steam to redistribute, preventing the crumb from collapsing when you release the springform sides.
As you prepare for baking, ensure your ingredients are on point by checking our recipe for Maple Donut Bars. These bars offer a delightful alternative and share similar preparation techniques that guarantee success.
Pro Tips for Success
- Temperature Control: Ensure all cold ingredients, especially eggs and sour cream, reach room temperature before mixing. This creates a stable emulsion that traps air effectively within the Maple Coffee Cake.
- Hydration Level: Do not overmix the batter once you add the flour. Overworking the dough develops excess gluten, which will turn your Maple Coffee Cake from tender to rubbery.
- Syrup Viscosity: If your maple syrup is particularly thin, reduce it slightly on the stovetop before adding it to the batter to concentrate the sugars and flavor.
- Oven Calibration: Most home ovens are inaccurate. Use an independent oven thermometer to ensure you are actually baking at 350°F. Even a 10-degree variance can ruin the rise of your Maple Coffee Cake.
- The “Toothpick” Fallacy: While a toothpick should come out clean, the most technical way to check a Maple Coffee Cake is by internal temperature. Aim for 200°F to 205°F for the perfect balance of moisture and structure.
Storage & Reheating Tips
To preserve the moisture of your Maple Coffee Cake, store it in an airtight container at room temperature for up to three days. For longer storage, wrap individual slices in plastic wrap and freeze them for up to two months. When reheating, avoid the microwave as it can make the streusel soggy.
Instead, place a slice in a toaster oven at 300°F (150°C) for five minutes. This restores the crunch of the topping while gently warming the interior of the Maple Coffee Cake without drying it out.
If you’re a fan of maple flavors, you might also enjoy our delicious Soft Baked Maple Donuts. These donuts complement the richness of Maple Coffee Cake beautifully and are perfect for a sweet breakfast treat.
What to Serve With This Recipe
While Maple Coffee Cake is traditionally a breakfast item, I prefer pairing it with high-contrast, healthy sides to balance the sweetness. Serve a slice alongside a bowl of Greek yogurt topped with fresh berries to add acidity and protein.
For a savory contrast, a side of roasted asparagus or a light arugula salad with a lemon vinaigrette works surprisingly well. These pairings cut through the richness of the Maple Coffee Cake and provide a more balanced nutritional profile for your meal.
Frequently Asked Questions (FAQ)
Can I use maple extract instead of real syrup?
No, I strongly advise against this. Real maple syrup provides essential moisture and a complex sugar structure that defines the Maple Coffee Cake. Extracts are often one-dimensional and chemical in nature. If you must use extract, use it only as a supplement to the real syrup.
Why did my streusel sink into the batter?
This usually happens if your batter is too thin or if you haven’t creamed the butter and sugar sufficiently. A properly aerated Maple Coffee Cake batter has enough structural tension to support the weight of the nuts and sugar on top.
Can I bake this Maple Coffee Cake in a muffin tin?
Absolutely. You can convert this Maple Coffee Cake into muffins by reducing the bake time to approximately 18-22 minutes. Ensure you fill the liners about three-quarters full to allow space for the streusel and the rise.
Maple Coffee Cake is a beloved dessert that showcases the rich flavor of maple syrup, making it a delightful addition to any brunch or coffee break. Known for its moist crumb and dense texture, it often features ingredients like sour cream and nuts that enhance both flavor and nutritional content; learn more about this delicious treat in this article on Coffee Cake.
Final Thoughts
This Maple Coffee Cake connects the precision of modern baking with the rustic warmth of traditional flavors. It is a technical achievement in texture and a bold statement in taste. Sharing this cake creates lasting memories, proving that a masterfully executed recipe is the ultimate culinary gift.
Nutrition Information (per serving)
| Nutrient | Amount per Serving |
|---|---|
| Calories | 385 kcal |
| Total Fat | 18g |
| Saturated Fat | 10g |
| Carbohydrates | 52g |
| Fiber | 2g |
| Sugars | 28g |
| Protein | 5g |
| Sodium | 210mg |
Maple Coffee Cake
This Maple Coffee Cake redefines morning indulgence with its architectural crumb and deep sweetness. Pure maple syrup provides a complex profile that white sugar cannot match. Every bite offers a technical balance between crunchy streusel and moist interior.
Ingredients
Method
- Preheat your oven to 350°F (175°C). Grease your springform pan with butter and line the base with parchment paper.
- Combine flour, brown sugar, cinnamon, and chilled butter cubes in a medium bowl. Use your fingertips or a pastry cutter until the mixture resembles coarse sand. Stir in the chopped nuts and set aside.
- Whisk the flour, baking powder, baking soda, and salt in a large bowl.
- In your stand mixer, beat the softened butter and granulated sugar until the volume increases and the color lightens.
- Add the eggs one at a time, ensuring each is fully incorporated before adding the next. Pour in the vanilla bean paste and a portion of the maple syrup.
- Alternately add the dry ingredients and the sour cream to the butter mixture, starting and ending with the dry ingredients.
- Pour half of the batter into the prepared pan. Sprinkle half of the streusel over the batter.
- Spread the remaining batter over the streusel layer. Top with the rest of the nut mixture. Press down slightly.
- Bake for 45 to 55 minutes, checking the internal temperature. The cake is done when it hits 200°F (93°C).
- Allow the cake to cool in the pan for 15 minutes before releasing the springform sides.
Notes
Store in an airtight container at room temperature for up to three days. For longer storage, freeze individual slices for up to two months. Reheat in a toaster oven at 300°F (150°C).