The Best Fluffy Pancakes recipe you will fall in love with. Full of tips and tricks to help you make the best pancakes.

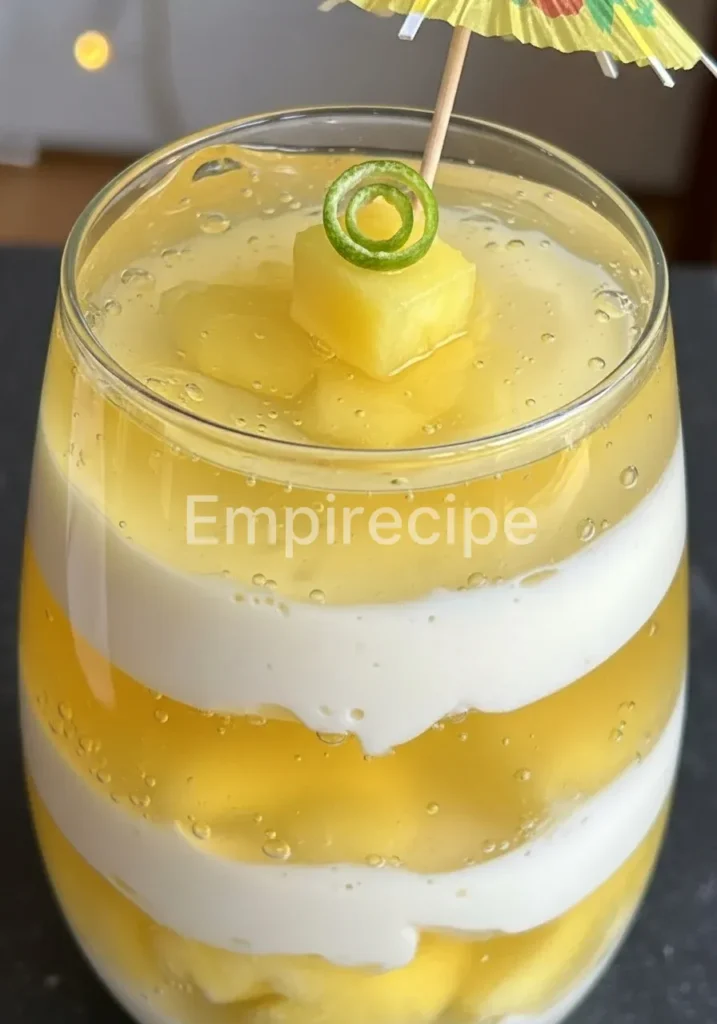
This Piña Colada Layered Gelatin brings a refreshing tropical breeze into your kitchen with its vibrant tiers of coconut and pineapple. I love how the creamy layers melt against the tangy fruit base, creating a balanced, light treat for the soul.
Table of Contents
Why You’ll Love This Piña Colada Layered Gelatin
- Pure tropical flavor escape.
- Beautifully elegant and vibrant visual stripes.
- Nourishing and wholesome guilt-free ingredients.
- A restorative and mindful preparation ritual.
Ingredients You’ll Need
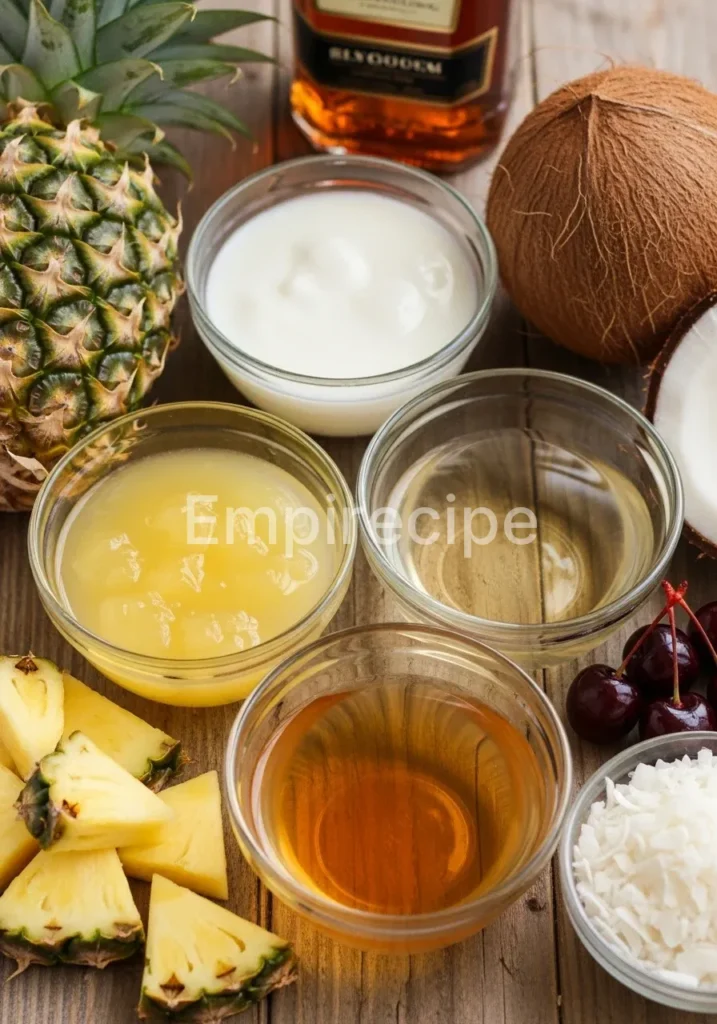
Creating a Piña Colada Layered Gelatin requires high-quality, natural ingredients to ensure the flavors truly shine. I always recommend using organic coconut milk and pure pineapple juice without added sugars to maintain that authentic, slow-living essence. When you choose wholesome components, you nourish your body while indulging your palate.
| Ingredient | Quantity | Notes |
|---|---|---|
| Pineapple Juice | 3 cups | Use canned or pasteurized juice. |
| Full-Fat Coconut Milk | 1 can (13.5 oz) | Organic provides the best creaminess. |
| Unflavored Gelatin | 4 envelopes (1 oz total) | Grass-fed gelatin is a wonderful option. |
| Honey or Maple Syrup | 1/2 cup | Adjust based on your sweetness preference. |
| Cold Water | 1/2 cup | To bloom the gelatin. |
| Vanilla Extract | 1 teaspoon | Pure bean extract for depth. |
| Fresh Mint or Maraschino Cherries | For garnish | Adds a beautiful pop of color. |
Substitutions & Variations
[ra_display_video url=”https://www.youtube.com/watch?v=w10osAZCPaE”]
If you prefer a plant-based lifestyle, you can easily adapt this Piña Colada Layered Gelatin by using agar-agar instead of traditional gelatin. Simply follow the manufacturer’s ratio for a firm set. For a lower-glycemic option, substitute the honey with monk fruit sweetener or stevia. You might also consider adding a splash of rum extract if you desire that classic cocktail flavor without the alcohol content.
For those who enjoy plant-based options, consider trying a delightful adaptation of this dessert. You can find a great recipe for a nourishing and fresh Spinach Soup with this link.
Equipment You’ll Need to make Piña Colada Layered Gelatin
Preparing a Piña Colada Layered Gelatin is a meditative process that requires a few simple kitchen tools. I find that using a clear glass mold or individual ramekins allows the beautiful layers to be the star of the show.
- A medium-sized saucepan for heating the liquids.
- A glass 9×13 pan or a decorative Bundt mold.
- A whisk to ensure a smooth, clump-free texture.
- Measuring cups and spoons for precision.
- A ladle for gentle pouring between layers.
Step-by-Step Instructions
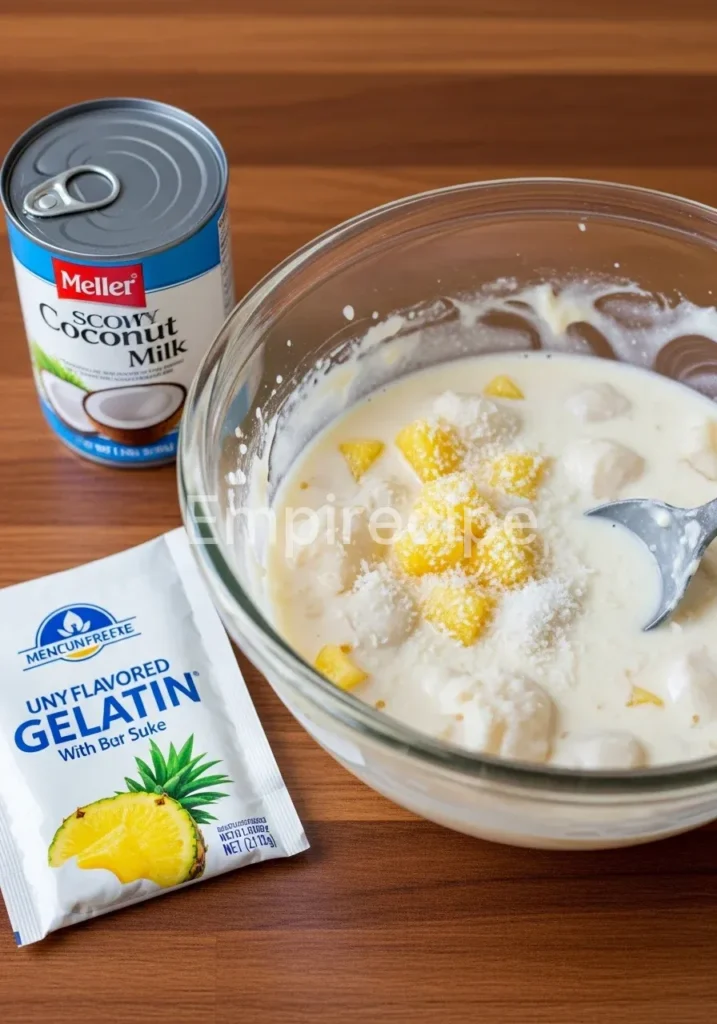
- Bloom the Gelatin: In a small bowl, sprinkle two envelopes of gelatin over 1/4 cup of cold water. Let it sit for about five minutes. This process, known as blooming, ensures that your Piña Colada Layered Gelatin has a perfectly smooth consistency without any grainy bits.
- Prepare the Pineapple Layer: Heat 3 cups of pineapple juice in a saucepan over medium heat until it begins to simmer. Remove from heat and stir in the bloomed gelatin until completely dissolved. Add your choice of sweetener if the juice isn’t sweet enough for your liking.
- The First Pour: Pour half of the pineapple mixture into your mold. Place it in the refrigerator for approximately 20 to 30 minutes. You want it to be “tacky” to the touch but not fully liquid, which allows the next layer of Piña Colada Layered Gelatin to adhere properly.
- Prepare the Creamy Coconut Layer: While the first layer sets, bloom the remaining two envelopes of gelatin in 1/4 cup of cold water. In a clean saucepan, gently heat the coconut milk and vanilla extract. Stir in the bloomed gelatin until smooth.
- Mindful Layering: Once the pineapple layer is slightly firm, slowly ladle half of the coconut mixture over the back of a spoon onto the first layer. This technique prevents the force of the liquid from breaking the bottom tier, preserving the clean lines of your Piña Colada Layered Gelatin.
- Repeat and Set: Continue alternating the layers, allowing each to chill briefly before adding the next. Once all layers are assembled, refrigerate the entire dish for at least four hours, or preferably overnight, to achieve the perfect wobble.
The blooming process is crucial for achieving the perfect consistency in your gelatin. If you’re interested in a similar low-carb dessert option, check out this Low-Carb Yogurt Gelatin.
Pro Tips for Success with Piña Colada Layered Gelatin
To achieve the most stunning Piña Colada Layered Gelatin, patience is your greatest ally. Never rush the chilling process; if the bottom layer is too soft, the colors will bleed together, losing that sharp, professional look. Furthermore, ensure you do not use fresh pineapple juice unless you boil it first.
Fresh pineapple contains bromelain, an enzyme that breaks down protein and prevents the gelatin from setting. By using canned or pasteurized juice, you guarantee a firm and reliable structure for your Piña Colada Layered Gelatin every single time. Finally, if you are using a mold, dip the bottom of the pan in warm water for five seconds before inverting it onto a plate to help it release cleanly.
Storage & Reheating Tips
Since this is a chilled dessert, you should never attempt to reheat your Piña Colada Layered Gelatin as it will melt back into a liquid state. To keep it fresh, store the gelatin in the refrigerator covered with beeswax wrap or an airtight lid. It will maintain its texture and flavor for up to five days.
I recommend keeping it in the coldest part of the fridge, away from the door, to ensure it stays firm. If you have prepared individual servings, they are wonderful for quick, mindful snacks throughout the week.
Maintaining the desired texture and flavor of your gelatin is essential for a delightful experience. To explore another delightful gelatin option, take a look at this Strawberry Vanilla Gelatin.
What to Serve With This Recipe
I find that the light and airy nature of Piña Colada Layered Gelatin pairs beautifully with other wholesome, earth-centered dishes. If you are hosting a brunch, serve this alongside a crisp arugula salad with a light citrus vinaigrette. The bitterness of the greens provides a lovely contrast to the sweetness of the coconut.
For a more substantial pairing, consider serving it after a meal of roasted seasonal vegetables or a light quinoa bowl. The tropical notes act as a palate cleanser, leaving you feeling refreshed rather than weighed down.
Frequently Asked Questions (FAQ)
Can I make this Piña Colada Layered Gelatin vegan?
Yes, you certainly can. To make a vegan version of Piña Colada Layered Gelatin, simply replace the bovine gelatin with agar-agar powder. Use approximately one teaspoon of agar-agar powder for every cup of liquid. Keep in mind that agar-agar sets much more firmly and at room temperature, so your layering process might move a bit faster.
Why did my layers separate when I tried to slice it?
This usually happens if the bottom layer was allowed to set too firmly before the next layer was added. When making Piña Colada Layered Gelatin, aim for a “sticky” or “tacky” consistency—like scotch tape—before pouring the next warm liquid. If the surface is too cold and hard, the layers won’t bond together.
Is Piña Colada Layered Gelatin high in protein?
If you use high-quality, grass-fed gelatin, this dessert actually provides a modest amount of protein and beneficial amino acids like glycine, which supports gut health and skin elasticity. While it is still a dessert, Piña Colada Layered Gelatin offers more nutritional benefits than a standard sugary cake or pastry.
Layered gelatin desserts, like Piña Colada Layered Gelatin, offer a stunning visual appeal as well as a burst of tropical flavors. These desserts are not only a festive addition to any gathering but also easy to customize, making them a popular choice among dessert enthusiasts who enjoy experimentation with flavors and textures. Learn more about layered desserts in this informative article.
Final Thoughts
This Piña Colada Layered Gelatin invites you to slow down and savor the simple beauty of a handmade dessert. By layering these flavors with intention, you create more than a treat; you create a moment of peace. Share this vibrant creation with those you love most dearly.
Nutrition Information (per serving)
The following table provides a breakdown of the nutritional content for one serving of this Piña Colada Layered Gelatin, assuming the recipe is divided into eight generous portions.
| Calories | 185 kcal |
| Total Fat | 9g |
| Carbohydrates | 22g |
| Protein | 6g |
| Sugars | 18g |
| Sodium | 15mg |
Piña Colada Layered Gelatin
This Piña Colada Layered Gelatin brings a refreshing tropical breeze into your kitchen with its vibrant tiers of coconut and pineapple. The creamy layers melt against the tangy fruit base, creating a balanced, light treat for the soul.
Ingredients
Method
- In a small bowl, sprinkle two envelopes of gelatin over 1/4 cup of cold water and let it sit for about five minutes to bloom.
- Heat 3 cups of pineapple juice in a saucepan over medium heat until it simmers. Remove from heat and stir in the bloomed gelatin until dissolved. Adjust sweetness if necessary.
- Pour half of the pineapple mixture into your mold and refrigerate for 20 to 30 minutes until tacky.
- Bloom the remaining two envelopes of gelatin in 1/4 cup of cold water. In a clean saucepan, heat the coconut milk and vanilla extract, then stir in the bloomed gelatin until smooth.
- Once the pineapple layer is slightly firm, ladle half of the coconut mixture over the back of a spoon onto the first layer. Repeat layering process with remaining mixtures.
- Refrigerate the entire dish for at least four hours or overnight.
Notes
Ensure you do not rush the chilling process; the bottom layer must be slightly tacky for proper layering. Use canned or pasteurized pineapple juice to avoid gelatin not setting.