The Best Fluffy Pancakes recipe you will fall in love with. Full of tips and tricks to help you make the best pancakes.
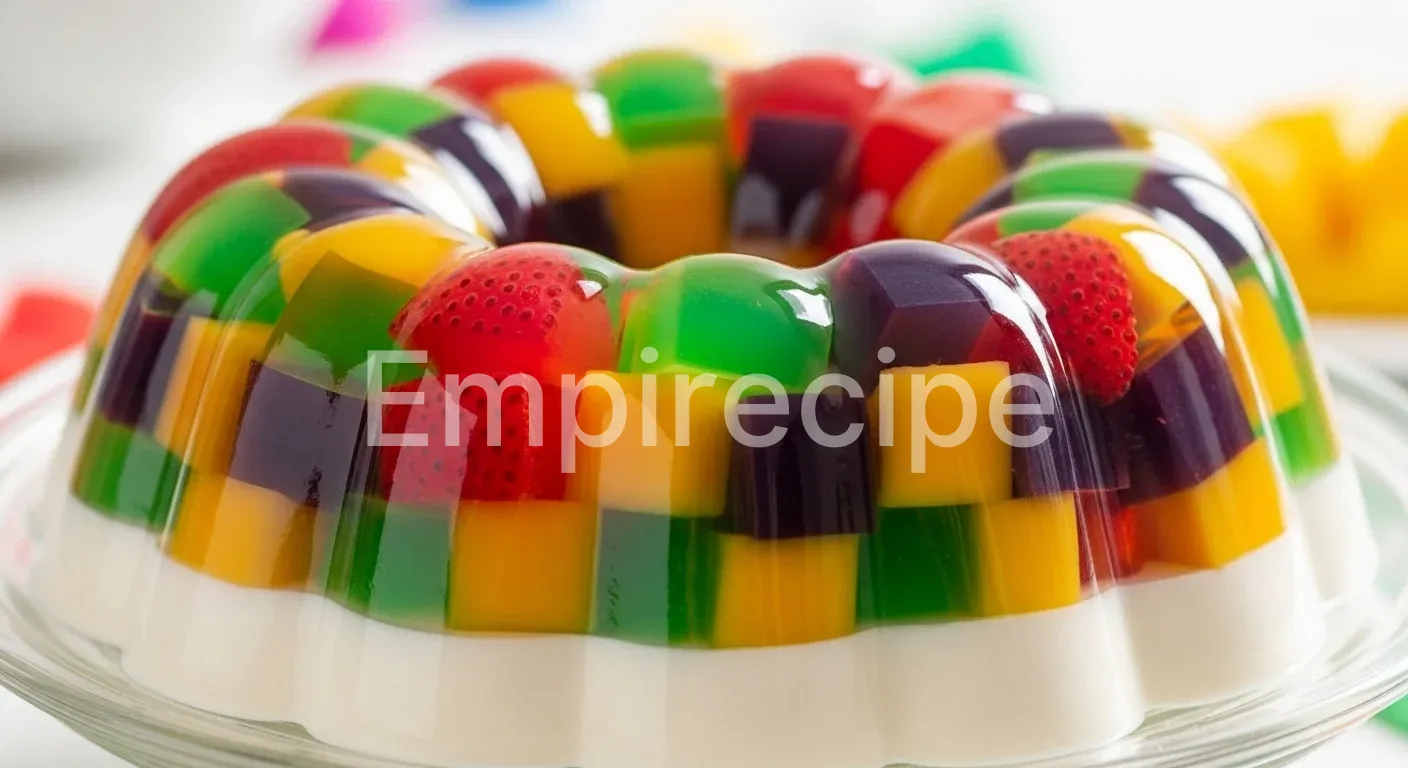
Experience the vibrant colors and creamy textures of a classic Mexican Jello, reimagined with a modern twist. This dessert features a stunning mosaic of fruity cubes suspended in a velvety base. It tastes like a celebration.
Your guests will love the refreshing mouthfeel. It is simple yet looks like a masterpiece.
Table of Contents
Why You’ll Love This Mexican Jello Recipe
- Bursting with vibrant, natural fruit flavors.
- Visually stunning mosaic pattern for any party.
- Easily adaptable for vegan and plant-based diets.
- Low-waste preparation using seasonal fruits.
Ingredients You’ll Need
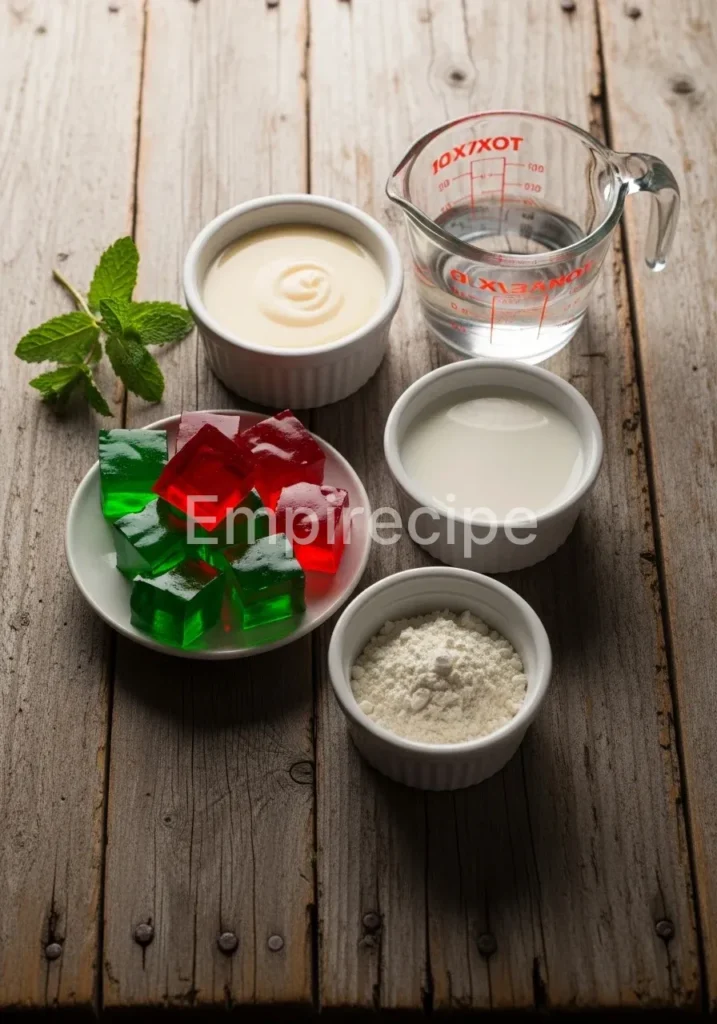
To create a high-quality dessert, you must prioritize the integrity of your ingredients. Using premium fruit juices and organic thickening agents ensures a cleaner taste and a better environmental footprint. For this recipe, we focus on a fusion of traditional aesthetics and plant-based innovation.
- 4 packs of flavored vegetable-based jelly (different colors like strawberry, lime, orange, and grape)
- 1 can of organic sweetened condensed coconut milk
- 1 can of evaporated coconut milk
- 1 cup of heavy coconut cream
- 2 tablespoons of agar-agar powder (for the white base)
- 4 cups of filtered boiling water (for the colored layers)
- 1 teaspoon of pure Mexican vanilla extract
- A pinch of sea salt to enhance the sweetness
- Fresh berries for a zero-waste garnish
Substitutions & Variations
[ra_display_video url=”https://www.youtube.com/watch?v=LjC7Invq8jg”]
Switch dairy for coconut milk to create a vegan delight. Use agar-agar instead of gelatin for a plant-based structure. Replace refined sugars with agave nectar or maple syrup to keep things natural and healthy.
If you’re looking for a delightful twist on traditional gelatin desserts, try the recipe for La Lechera Orange Gelatin. This refreshing option is a great way to add a citrusy flavor that’s both sweet and tangy.
Equipment You’ll Need
- 4 shallow rectangular glass containers (for the colored layers)
- 1 large Bundt pan or silicone mold
- A sharp knife (for clean geometric cuts)
- A large whisk
- A medium saucepan
- Measuring cups and spoons
- A flexible spatula
Step-by-Step Instructions
- Prepare the Vibrant Colors: Dissolve each flavored jelly packet into one cup of boiling water. Pour each color into separate shallow glass containers. Ensure the liquid height reaches about half an inch. Refrigerate these containers for at least 4 hours or until they become very firm.
- Slice the Mosaic Cubes: Once the colored layers set completely, use a sharp knife to cut them into small, even cubes. I prefer half-inch squares for the best visual effect. Carefully lift the cubes out with a spatula and mix them gently in a large bowl. Keep them chilled while you prepare the creamy heart of the Mexican Jello.
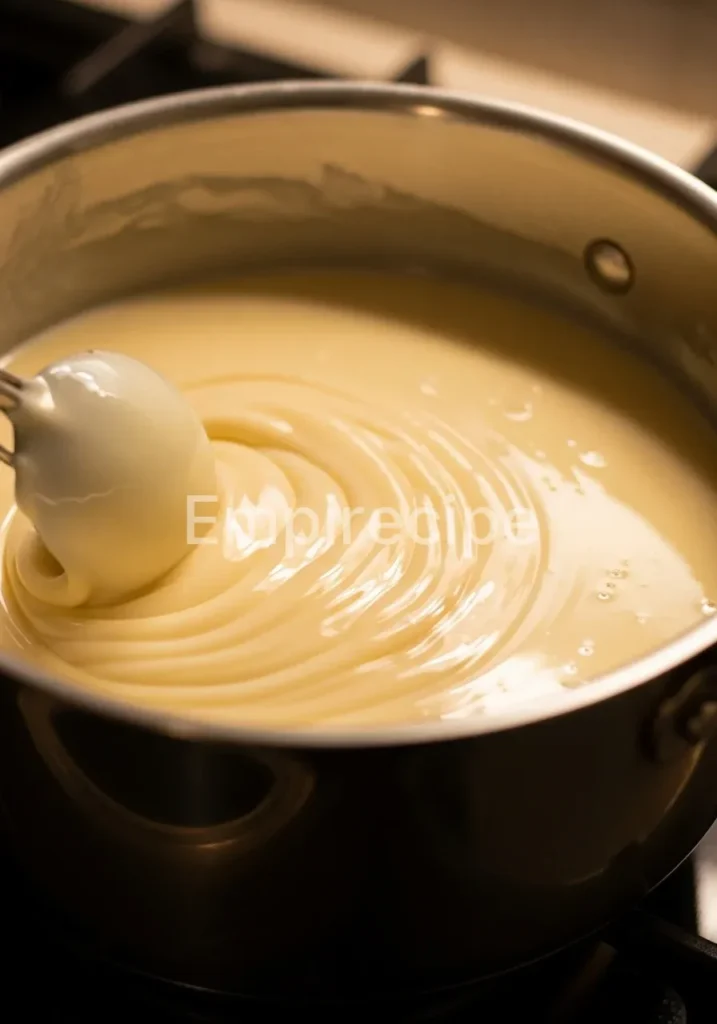
- Cook the Creamy Base: In a medium saucepan, combine the evaporated coconut milk, sweetened condensed coconut milk, and heavy coconut cream. Sprinkle the agar-agar powder over the surface and let it bloom for two minutes. Turn the heat to medium and whisk constantly. Bring the mixture to a gentle simmer for three minutes to activate the agar-agar.
- Flavor the Base: Remove the saucepan from the heat. Stir in the Mexican vanilla extract and a pinch of sea salt. Allow this mixture to cool down significantly. It must be room temperature before you proceed, or it will melt your beautiful colored cubes.
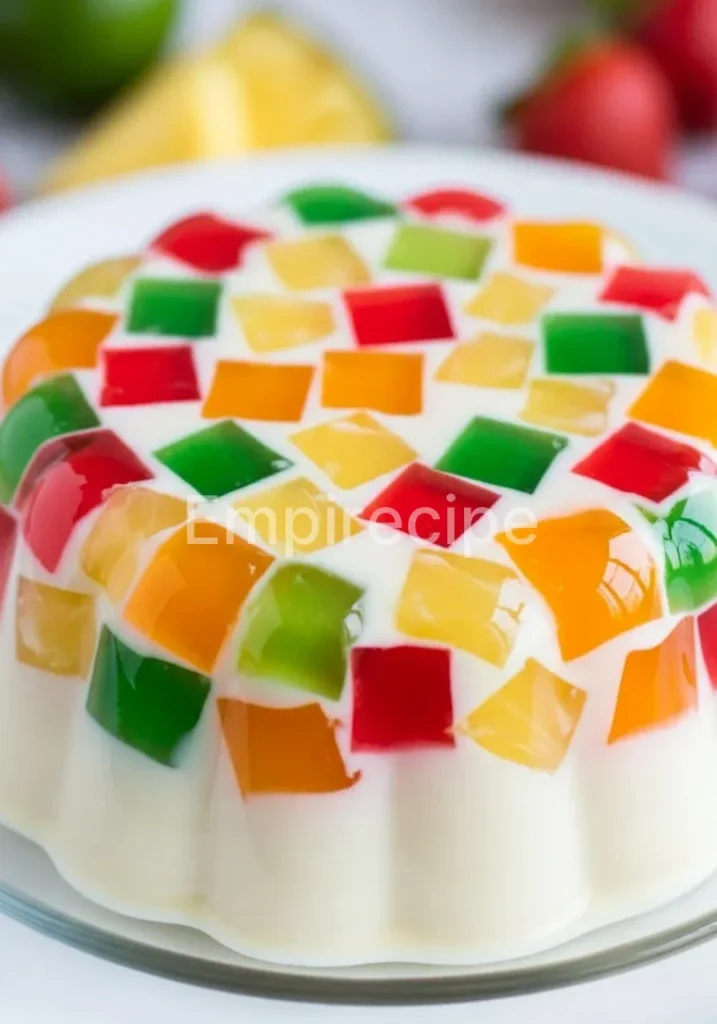
- Assemble the Masterpiece: Lightly grease your Bundt pan with a tiny drop of neutral oil. Distribute the colored cubes evenly inside the mold. Pour the cooled creamy mixture over the cubes, ensuring it fills all the gaps between the colors.
- The Final Chill: Place the mold in the refrigerator. Let the Mexican Jello set for at least 6 hours, though overnight is always better for structural stability. This patience ensures a perfect release from the mold.
- Unmold and Serve: Carefully pull the edges of the jello away from the mold with your fingers. Invert the mold onto a large serving plate. Shake it gently until you hear the sound of the seal breaking. Lift the mold slowly to reveal your colorful creation.
While you’re busy crafting your colorful mosaic, consider pairing it with a warm bowl of Chorizo Soup. The hearty flavors of the soup complement the lightness of the Jello, making for a satisfying meal.
Pro Tips for Success
Achieving the perfect Mexican Jello requires attention to temperature and timing. Firstly, always ensure your colored cubes are cold when you pour the white base over them. If the base is too hot, the colors will bleed, creating a muddy appearance instead of a sharp mosaic.
Furthermore, use agar-agar carefully. Unlike traditional gelatin, agar-agar sets at room temperature and provides a firmer, more “snappy” texture. You must boil it to activate it properly, but do not overcook the coconut milks as they can separate.
Additionally, if you struggle with the mold release, dip the bottom of the pan into warm water for exactly five seconds. This briefly melts the outer layer, allowing the dessert to slide out effortlessly. Finally, prioritize aesthetics by choosing contrasting colors.
A mix of deep reds, bright greens, and oranges creates the most dramatic effect against the white background. This attention to detail elevates the dish from a simple snack to a gourmet centerpiece.
Storage & Reheating Tips
Store your Mexican Jello in an airtight container in the refrigerator to maintain its moisture and bounce. Because this recipe uses plant-based milks, it stays fresh for about 4 to 5 days. Never freeze this dessert.
Freezing destroys the cellular structure of the gelling agents, resulting in a watery, spongy mess upon thawing. If you are serving this at an outdoor event, keep the plate over a bowl of ice to preserve its firmness. Unlike many desserts, you should never reheat this dish.
It is designed to be enjoyed cold, offering a refreshing contrast to spicy main courses. If you have leftovers, you can chop them up and serve them in individual glass cups topped with a dollop of whipped coconut cream for a “deconstructed” look that prevents food waste.
To maintain the freshness of your Mexican Jello, remember to store it properly in the fridge. For ideas on what to serve alongside, check out Ground Beef Pasta: Quick & Delicious Recipes You Need to Try, which is perfect for any occasion.
What to Serve With This Recipe
This dessert pairs beautifully with light, refreshing side dishes that balance its creamy sweetness. Consider serving it alongside a zesty jicama and lime salad. The crunch of the jicama complements the smooth texture of the Mexican Jello perfectly.
Alternatively, roasted pineapple with a dusting of chili powder offers a sophisticated flavor fusion. If you want a beverage pairing, a cold glass of hibiscus tea (Agua de Jamaica) provides a tart acidity that cleanses the palate between bites.
For a more substantial meal, serve this after a spread of veggie tacos or black bean enchiladas. The coolness of the jelly acts as a natural fire extinguisher for spicy salsas, making it a functional and delicious conclusion to a festive dinner.
Frequently Asked Questions (FAQ)
Is this version of Mexican Jello healthy?
Yes, this version is much healthier than traditional store-bought versions. By using coconut milks and agar-agar, you avoid synthetic dyes and processed bovine gelatin. We use natural sweeteners and real vanilla, which provides a better nutrient profile and reduces the glycemic load of the dessert.
Can I add fresh fruit inside the jello?
You can certainly add fresh fruit, but you must be careful with certain types. Fruits like kiwi, pineapple, and papaya contain enzymes that can prevent the jelly from setting. To avoid this, lightly steam these fruits before adding them to your Mexican Jello, or stick to berries and citrus segments which do not interfere with the thickening process.
How do I make the colors more vibrant without chemicals?
To keep your Mexican Jello eco-friendly and natural, look for vegetable-based food colorings derived from beets, spirulina, or turmeric. You can also use concentrated fruit juices mixed with agar-agar to create your own cubes from scratch. This method ensures that every color in your mosaic is derived directly from nature.
Mexican Jello, known for its vibrant colors and delicious flavors, is a popular dessert in Mexican cuisine. This delightful treat often features layers of jello combined with creamy ingredients, creating a beautiful mosaic effect and a refreshing taste that is enjoyed at celebrations and gatherings. For more information, visit this page.
Final Thoughts
Bringing this Mexican Jello to your table means sharing a piece of colorful heritage infused with modern, sustainable values. It is a joyful, wobbling masterpiece that connects people through sweetness and creativity. Enjoy every vibrant bite of this eco-friendly fusion treat!
Nutrition Information (per serving)
This summary provides an estimate based on plant-based ingredients and standard serving sizes.
| Nutrient | Amount per Serving |
|---|---|
| Calories | 185 kcal |
| Total Fat | 9g |
| Saturated Fat | 7g |
| Carbohydrates | 24g |
| Fiber | 2g |
| Sugars | 18g |
| Protein | 2g |
| Sodium | 45mg |
Mexican Jello
Experience the vibrant colors and creamy textures of a classic Mexican Jello, reimagined with a modern twist. This dessert features a stunning mosaic of fruity cubes suspended in a velvety base, bursting with natural fruit flavors. It’s visually stunning and easily adaptable for vegan diets, making it a perfect centerpiece for any celebration.
Ingredients
Method
- Dissolve each flavored jelly packet into one cup of boiling water. Pour each color into separate shallow glass containers and refrigerate for at least 4 hours.
- Once the colored layers are set, cut them into small cubes and mix them gently in a large bowl. Keep them chilled.
- In a medium saucepan, combine evaporated coconut milk, sweetened condensed coconut milk, and heavy coconut cream. Sprinkle agar-agar over the surface and let it bloom for two minutes. Heat and whisk until it simmers for three minutes.
- Remove from heat, stir in vanilla extract and sea salt. Let it cool to room temperature.
- Grease a Bundt pan and distribute the colored cubes evenly inside. Pour the cooled creamy mixture over the cubes.
- Refrigerate the mold for at least 6 hours until set.
- Carefully unmold by pulling the edges away and inverting onto a serving plate.
Notes
Ensure colored cubes are cold before pouring the white base over them to avoid bleeding. Use contrasting colors for the best visual effect.